PAINTED BATHROOM CABINETS || before + after

IMG_4992.jpg

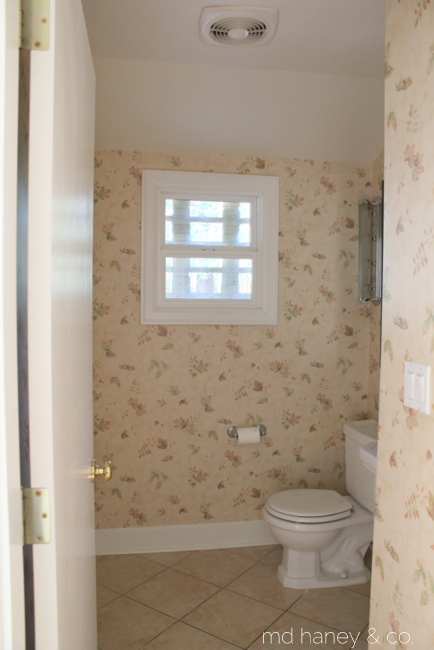
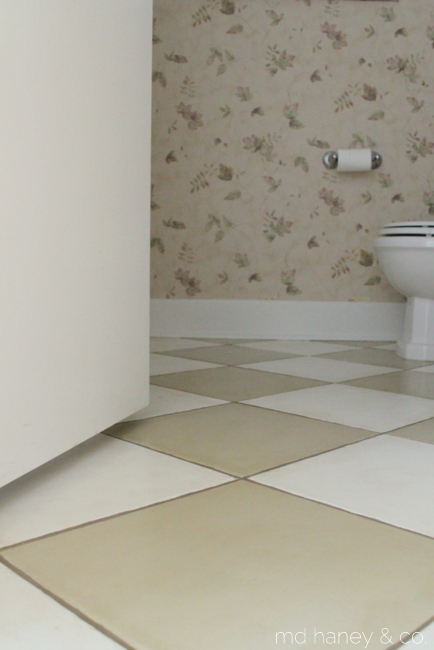
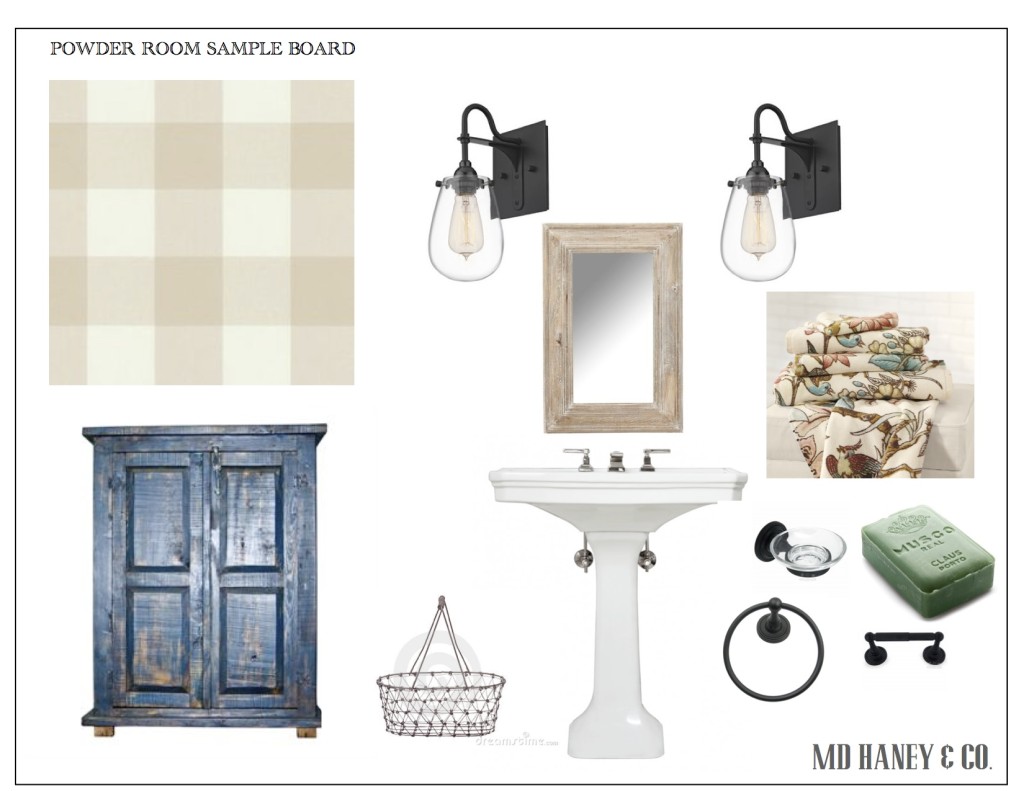
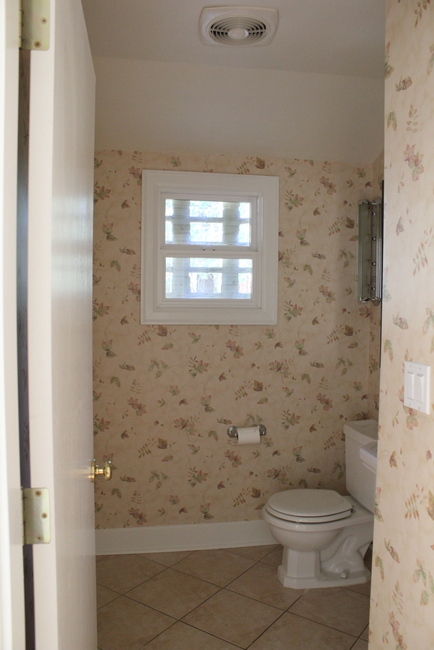
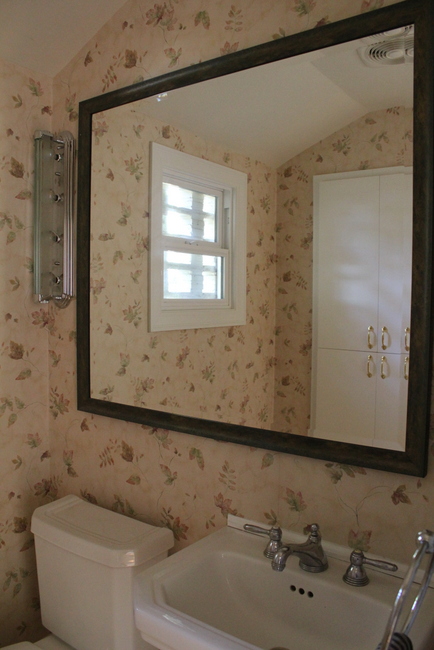
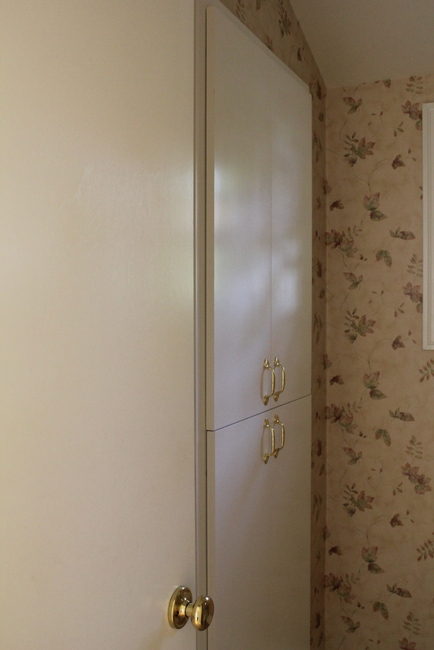
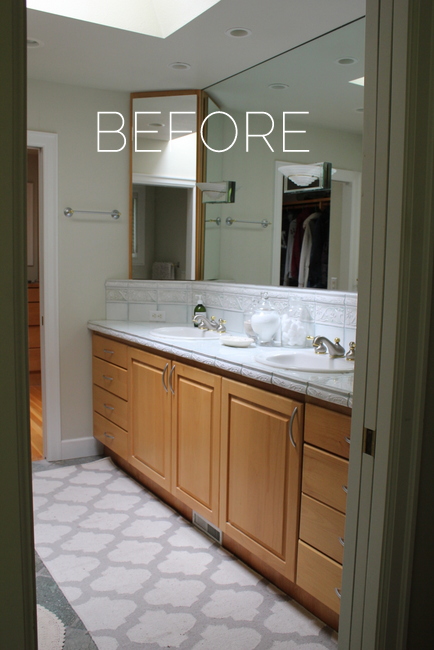
A few months ago I decided to paint our master bathroom cabinets.  Although we hope to remodel that space eventually, it falls very low on the priority list.  It functions and it is clean, by clean I mean not falling apart ;-).  There is no need to move that project to the top of the list, we have plenty more 'urgent' projects that need to be tackled!  But, I still want to start making changes!

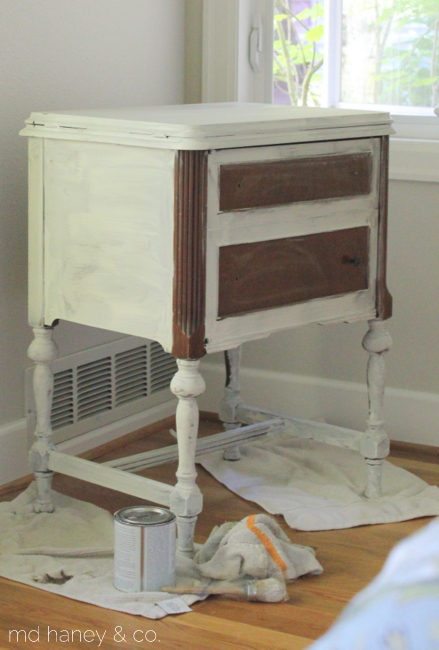
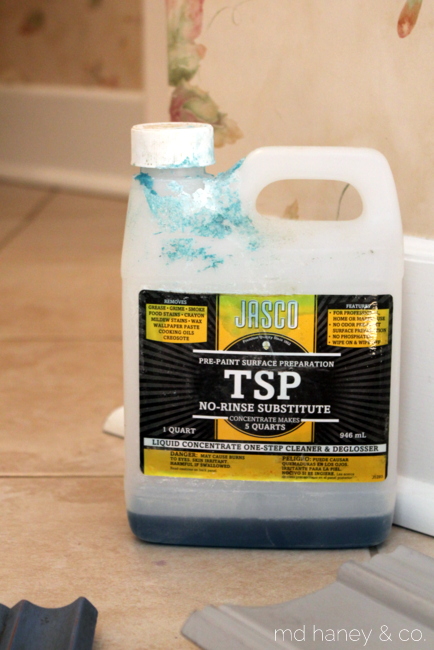
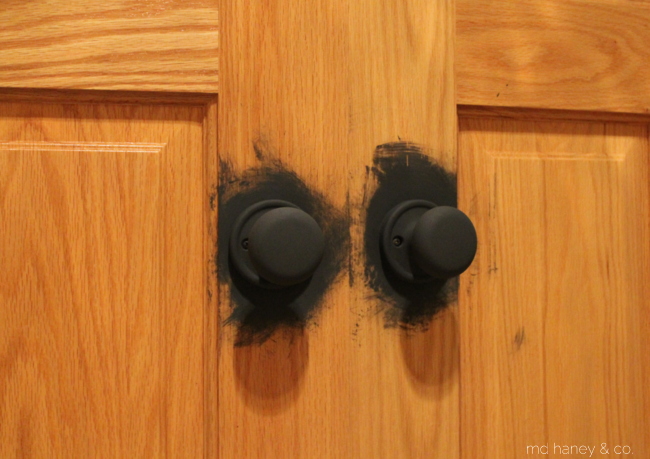
The original maple cabinets are in good shape and they were very easy to paint.  I used a rough grit sand paper to scuff up the cabinets.  I scrubbed them down well with TSP and warm soapy water.  I wiped the damp cabinets with a dry cloth and waited for everything to be completely dry.  Easy-peasy!

IMG_4540

IMG_4541

IMG_4542

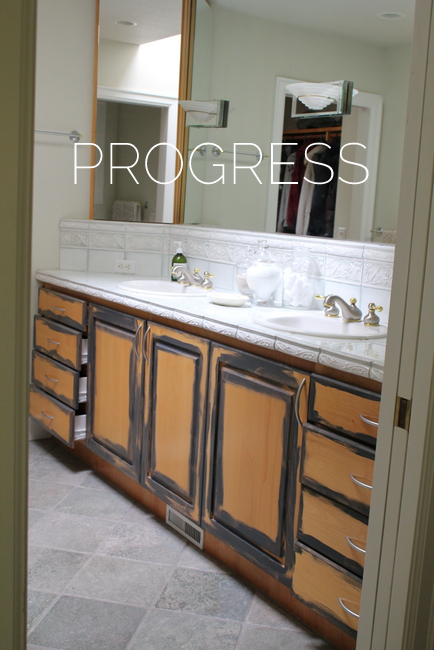
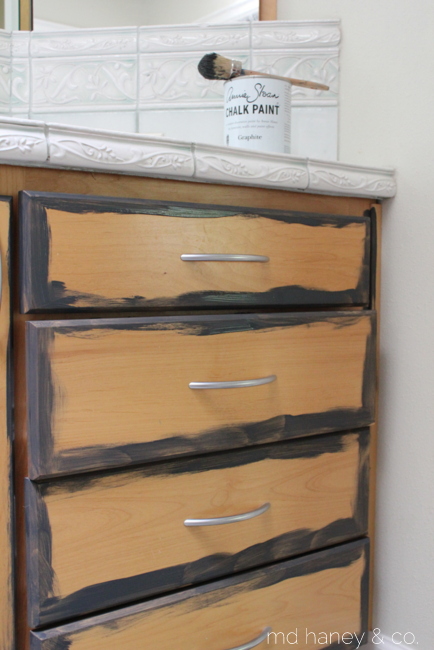
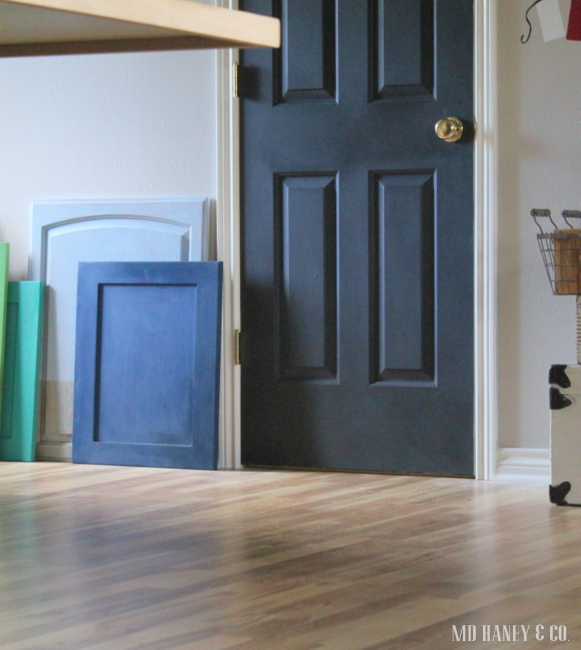
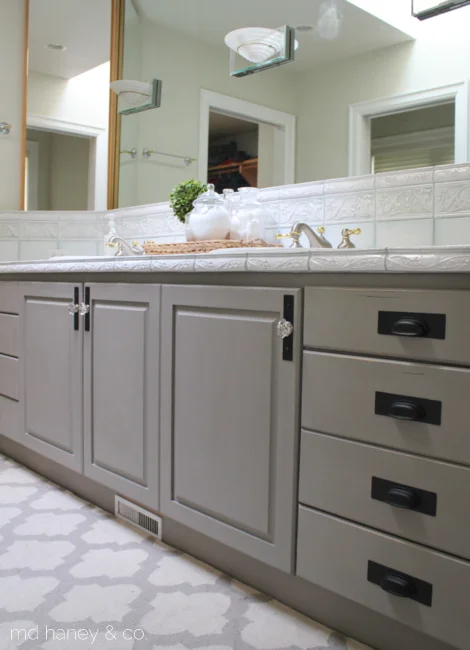
I knew that I wanted to slightly distress the cabinets.  I wanted black to show through when I distressed.  Instead of painting the entire cabinet black {GRAPHITE}, I painted one, thin coat along the edges, where I planned on distressing.  I rubbed the edges with a hard beeswax so that when I sanded the second color, the black would show through, not the original maple.

IMG_4991

IMG_4995

IMG_4996

IMG_4998

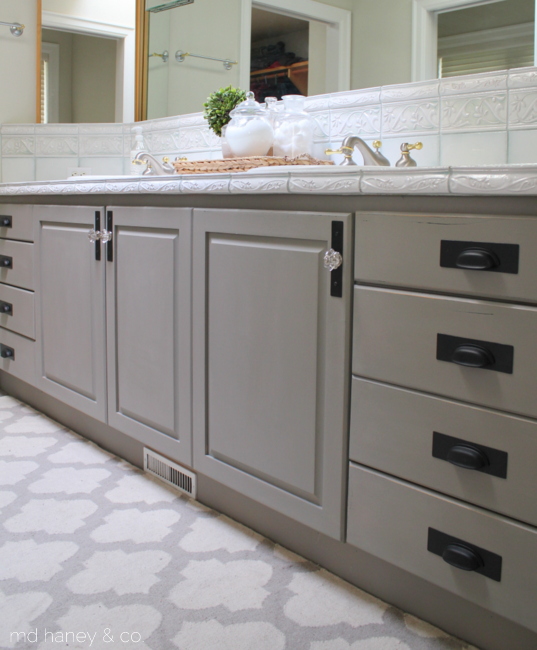
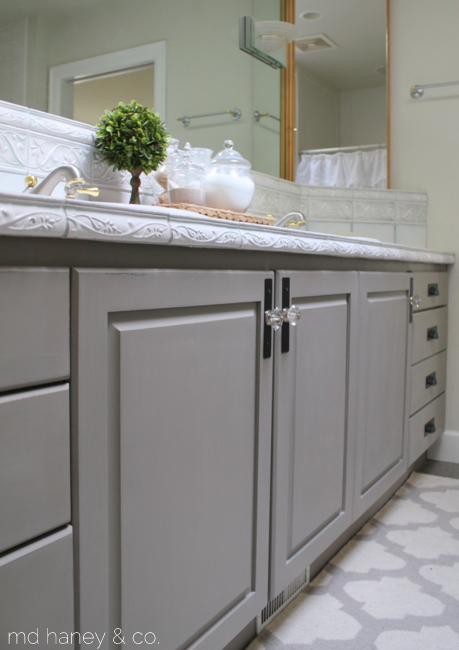
I applied two coats of FRENCH LINEN and then lightly sanded the edges to reveal the black paint underneath.  I waxed with Annie Sloan's clear wax.  The original hardware was a bit modern for my taste.  They must have been a custom size because I couldn't find any knobs or pulls that would match the existing drilled holes!  Instead of filling and sanding the existing hardware holds and then re-drilling new holes, Matt cut down a sheet of metal to make metal plates.  We sprayed them with a matte black textured spray paint and we used that to attach the new hardware.  Still time consuming, but not as time consuming as filling/sanding/drilling new holes would have been!

There is a lot we want to do to this space with the timing is right.  But for now, I will keep making simple changes and 'tweaking' it here and there ;-)

PAINTED FABRIC || painting fabric with Chalk Paint®

A few weeks ago, I received a phone call from a lady; they were moving her mom to an apartment and needing to downsize.  She wanted to know if I would like to come look at the items they were needing move.  I loaded up the girls, picked up a girlfriend and we were on our way.  She had a beautiful table and chair set.  Absolutely beautiful!  But, it was a big set and I didn't have room.  So I came home with a pair of chairs and some smaller treasures.

IMG_4837

The chairs were in really good shape, and super comfortable.  Since I don't have the skills necessary to reupholster these beauties, I decided to paint them.

IMG_4957

IMG_4962

IMG_4963

IMG_4973

IMG_4970

Here are the details on how I painted fabric with Chalk Paint®.

- Vacuumed the fabric and trimmed the loose strings.

- Wiped down the wood with a warm, damp rag.  After allowing the wood to dry, I painted two coats of Milk Paint {Miss Mustard Seed Milk Paint ~ ironstone} on the wood.  I was fine with the paint chipping, so I did not apply the bonding agent.

- For the fabric, I added water to Chalk Paint®.  I added 4 parts {OLD OCHRE} Chalk Paint® to a mason jar and 1 part water.  Shake it good to thin the paint down a bit.  By thinning the paint down it helps the paint to cover easier, and it makes it a bit softer to the touch once it dries.

- Once the fabric was painted, I touched up the painted wood with an artist brush.  I didn't tape anything off, so naturally I had a bit of the fabric paint color on the wood details.  I sanded the edges of the wood to give the wood a distressed look.

- The last step was to apply clear wax to the wood and the fabric.  The wax helped to soften the fabric and also provides a protective barrier.

I am very happy with the results.  The fabric is not 'crunchy' or hard.  It's not super soft like cotton or linen, it feels more like an outdoor fabric.  One day I may have these chairs reupholstered, but for now I am very happy with how they turned out!  And no sewing skills were required ;-)

PAINTING KITCHEN CABINETS || part 1

It has already ben eight months since we moved!  We haven't done any major renovations on our own home, since having children {about four years ago}.  It's not that we forgot how time consuming it is to do a renovation on our own home, it's that we can't find the time to do it…..without little people helping. We thought we would have the basement completely finished before football season started.  Nothing has changed in the basement for two months, and we still have a ways to go!  Anyways, the point is…..we plan on doing a major renovation to our kitchen next winter.  But, I am quickly realizing that it may be a couple of years before we renovate.    Since we moved into this home, I haven't touched the kitchen.  Well, the rain came this week and I decided to start painting the kitchen!  I started with the walls, and yesterday I painted the kitchen island.  I was reminded of how much I love Chalk Paint®!  It truly is an amazing product!  I still have more cabinetry to do, but I thought I would share some tips and tricks for painting kitchen cabinets.

IMG_4813


IMG_4825

Use steel wool or a scotch bright pad to remove gunk, spills and food.

IMG_4827

Wipe down cabinetry with low-odor mineral spirits or a degreaser cleaner.  Finally, wipe cabinets with warm water and a clean rag, let cabinetry dry completely.  Tape any area that need to stay 'clean'.

IMG_4828

IMG_4829

You can see that the first coat can be a bit scary.  The first coat always looks bad!  The dry time is fast.  Once the paint is dry to the touch, you can start with the second coat.  After the second coat is dry, you can distress the edges, if that is the look you are trying to achieve.  I always distress in areas that look like they would naturally get worn and beat up.  If distressing, sand with a high grit sandpaper and wipe down the cabinetry.  You don't want any paint dust on the cabinets when you wax!  Wax with soft wax and you are done!  This island {which is really big} only took me a few hours.  I finished it during the girl's nap time and then finished waxing while I was making dinner….it really is that easy!  I will post more pictures when I finish the other cabinets.  Until then, I have listed a few tips below!

IMG_4834

Helpful tips for painting cabinetry with Chalk Paint®

-The simplest way to paint cabinetry with Chalk Paint®, is to paint them in place.  You may choose to remove the doors and drawer faces for painting.  Make sure to mark each cabinet with a labeled  piece of tape, then you aren't playing a guessing game when it's time to put the doors back on.

-Remove knobs and pulls, place all of the hardware {including screws} into a ziplock bag.

-If you are painting the interiors of the cabinets, remove the shelves and support clips and be sure to mark each shelf accordingly.

Painting over previously finished cabinets:

-Make sure that the surface is clean and free of loose particles.  Use a scotch bright pad or steel wool to lightly scrub the surface.  Next, remove any old, greasy, waxy or oily residue (you can use low-odor mineral spirits, TSP, Crud Cutter or any cleaner that cuts through grease}.  Rinse with clean rag and warm water and let it dry completely.

-Fill any cracks or holes with wood filler or speckling.  Allow to dry and sand smooth with fine grit sandpaper.

-Typically there is no need to sand or prime.  Although in areas that receive a lot of use, it might be wise.

-Tape any areas that need to stay clean {floor, appliances, etc} and begin painting!  It typically will take two coats of paint.  Distress if that is the desired look.  Wax with soft wax.  Cabinets will clean with a mild soap and warm water.

BEFORE + AFTER || oak table

Matt has wanted to build a farm house table for our dining room, but the reality is, it's falls short on the priority list.  My wood working skills do not even compare to my handy husband, so I knew there was no way I would attempt to build my own!  My in-laws lent us their extra oak dining set since we sold our last dining room set with our house.  A few weeks ago I was telling Matt's mom that we just couldn't agree on a new dining room set to buy.  Matt really wants to build something but I want something sooner than later.  :-0

She said we could just have the dining room set we were borrowing!  Perfect!  The next day I started painting..

IMG_4548

The table is in great shape.  Solid oak and the perfect size for our dining room.  I painted the base with Chalk Paint® {Old White}.  Just one coat since I wanted it to be heavily distressed.  I then applied one coat of clear wax and a bit of dark wax to age the base a bit more.

The top is painted with Chalk Paint® {French Linen} and thinned with water, for more of a washed look.  I sanded the edges and applied two coats of the Annie Sloan lacquer.  The lacquer has a matte finish and is very durable, great for our family who uses this table almost three times a day.

IMG_4688

IMG_4636

IMG_4641

I bought four metal chairs and two upholstered chairs to replace the oak chairs that were part of the original set.  I love mixing different styles and finishes.  Plus, these chairs are pretty indestructible…..good for a family with little people and messy big people ;-)

FALL CLASS SCHEDULE

IMG_4608

Just a quick note to let you know that the Fall Class Schedule has been updated on the 'paint + classes' page of the website and I will post it here as well.

I am getting ready for a booth at this weekend's Carlton Crush Festival, as well as tending to my sick baby girl and recovering from a yucky flu bug…so I probably won't  do a fun blog  post this week.  But next week I will be back 'on my A game'!

Have a great week!!

fall class schedule copy

BEFORE & AFTER || a sewing table

A few weeks ago I picked up this darling little sewing table at Goodwill.  It was only $8 and I was looking for a little table for our master bedroom.

Now I forgot to take a 'BEFORE' picture, but I took one shortly after I started.  I think it's even better than a true 'BEFORE' because it shows how the first coat of white paint looks.  It looks bad and if you haven't painted with Chalk Paint® or Milk Paint, you may get nervous or discouraged after the first coat.  Fear not, the second coat always looks great!

IMG_4552

IMG_4553

A majority of the table is painted with PURE WHITE Chalk Paint®.  It took two coats, and then I distressed the edges.  This is an old piece and I want it to look old and full of character.

I then painted the doors and the fluted detail on the legs with TROPHY MMS Milk Paint.  After one coat of the Milk Paint, I sanded the doors, I still wanted to see the beautiful (but damaged) wood underneath.  The entire piece received one coat of clear wax and it was tucked into the little corner in my bedroom that afternoon!

IMG_4591

IMG_4594

IMG_4596

One of the many things I love about both of these paints is the fast drying time.  I can finish a piece in one day and have it decorated or functioning that evening!!  I am an instant gratification kind of girl and this paint works perfectly for refinishing a piece quickly!  Love it!

PAINTED CERAMIC TILE

Every time I talk to one of you lovely ladies (or gentlemen) who reads the blog, you always say how much you love seeing pictures of our home projects.  Matt and I both love working on our home, so it's fun for me to share pictures and projects!  We have A LOT of 'un-finished' projects, as 'one things leads to another'.  The beauty of this is that all of the sudden a lot of projects will be wrapped up at the same time ;-)

I am slowly working on making changes to our powder room.  I hope to wallpaper within the next couple of weeks and I just finished painting the ceramic floor tile last week.  I thought I would share a few photos and my thoughts on painting tile.

IMG_4513

Here is the 'BEFORE' photo.

Now, let me start by saying my approach with painting the floor tile was that if it didn't turn out, we could rip it out and replace it with new tile.  That wouldn't be ideal, but I knew it was an option.  **I may not have been so brave as to paint the floor tile if I didn't know that we could replace it if it was a total bomb.**  Also, we had some extra floor tile stored in the basement.  I tried painting and sealing several pieces before actually painting the floor.

IMG_4523

IMG_4525

IMG_4524

I began by scrubbing the floor with TSP. I let the floors completely dry and made sure they were clean before I moved onto taping the trim and plumbing fixtures.  Once everything was clean and taped, I painted the entire floor with 'Country Grey' Chalk Paint® decorative paint.  As you know, I love (and sell) Annie Sloan's paint.  I love it and use it on everything!  I have used it on concrete floors, and was curious as to how it would paint and hold up on a tile floor.

After two coats of the 'Country Grey', I cut in the alternating squares with 'Pure White'.  'Pure White' is the bright white offered in the line up of beautiful colors.  I used an artist brush to cut in.  I probably could have used tape to tape off the squares, but I didn't want to risk the tape pulling off the freshly painted grey paint.

IMG_4528

IMG_4527

I cut in (two coats) of 'Coco' Chalk Paint® over the grout lines.  I wasn't loving the look because the grout lines were not straight.  I just looked like painted tile, but not necessarily in a good way.  My sweet and well intentioned husband kept making suggestions and I knew he was trying to think of a polite way to say it look a bit tchotchke.

IMG_4544

IMG_4545

So, I took my own advice…..keep working on it until you love it!  You can always change something to make it more of what you like.  I lacquered the floor with the Annie Sloan Lacquer.  It's an awesome product.  It seals and protects and has a beautiful matte finish.  Not to mention it's water based for easy clean up!

After two coats of lacquer, I applied a light coat of dark wax.  The dark wax provided just the bit of aging and distressing I needed to make the imperfect grout lines look worn and a bit more authentic.  I kept everyone off of the floor tile during this entire process and followed the instructions on the lacquer container.  I also kept everyone off of the finished floor for a week, this little powder room gets a lot of foot traffic and I wanted to give the floor a fighting chance!  So far it looks really great and has held up very well.  And for those of you who know my husband, he is a tough critic!  He likes it and said it looks great ;-)

The last picture makes the wallpaper and floor tile color look a little off.  It actually matches perfectly and looks really good against the oak wood floor which is right outside of the bathroom door.  Hopefully I will have pictures to post soon of the new wallpaper!  Until then, I am off to paint the ceiling of the dining room and living room.  Not super fun but I love what a fresh coat of paint does to a room!!

If you have questions about painting tile, don't hesitate to shoot me an email or ask in the comments section.

xoxo~

Darci

REPURPOSING CABINET DOORS || painted signs

As you may already know, I love to use cabinet doors to hand paint signs.  I love that they are already 'cut and framed'.  No building or prep work, just paint and hang!

IMG_3057

I made these these two last summer and hung them in our covered outdoor space.  Matt used old square-head nails to hang them, they were my favorite.  When we sold our home, we sold it furnished, these two signs were included in the sale.

IMG_3060

Since we have moved, I haven't taken the time to make any new signs.  Last week a friend/client gave me some extra cabinet doors from a kitchen remodel she had done years ago.  She was keeping the doors for a future project, but was finally ready to just clean and purge.  I know that feeling well ;-)  Anyways, she sent me home with four large cabinet doors…..

IMG_4533

IMG_4539

IMG_4537

Simple little reminders.  And they just cost me an afternoon and a little bit of paint!  My kind of project!!

**For any of you who might want to make a similar sign, here are some very technical instructions {wink}…

I painted the cabinet door with two coats of French Linen {Chalk Paint®}.

Typed the wording than printed the wording in black.

Cut the words than traced over them firmly with a ball paint pin.

Used an artist brush and painted the letters with Graphite {Chalk Paint®}.

Distressed with 180 grit sandpaper.

Waxed the entire sign with clear wax.

Happy painting!!

ONE PROJECT LEADS TO ANOTHER || the joys of remodeling your own home

We are loving this sunny, warm weather!  What about you?

We have been working hard, but balancing it out with some fun play too.  Matt is just finishing up a couple bathroom remodels and starting to build the cabinetry for a client's home library, it's going to be a beauty!!  (I hope to get pictures of the bathrooms soon, they turned out really nice.) On the weekends and some evenings, we have been working on our basement.  The playroom is progressing….

IMG_4522

IMG_4519

And one thing always leads to another….Matt has to rebuild the stairs leading to the basement, which leads to new trim work, which leads to 'why not add paneling to the wall', which leads to ' let's make some changes in the powder room since you see the wall and stairs from the powder room'….we have a sickness.  Seriously.  And the worse part is, we feed off of each other!

So, now with all of my other half finished projects, I am going to start on the powder room.  Below is a quick sample board I threw together and a few pictures of the powder room as it sits now.

haneyprm copy

IMG_4513

IMG_4516

IMG_4514

We are going to cover the existing wall paper with a neutral buffalo check wallpaper, add new doors and new trim to the current built-in and then paint it blue, new lights and plumbing fixtures and I am going to attempt to paint the tile.  I am thinking a black and white check?!?  I have seen a lot of painted tile projects online, so I am going to try my hand at it!

In the mean time, I am off to make paper chains with my sweet pea!

Happy Summer!!

THE PLAYROOM || progress

So the 'to-do' list is never ending, as well as the grocery list, the 'project' list, the 'friends we would like to have over for dinner' list and so on.  I have always been a list maker.  But, shortly after we moved in February, I realized the lists had a bit too much control over my mind and my attitude.  What's with that?  That's not how I wanted to live.  I wasn't leaving room in the margins, and if someone or something came between me and crossing off an item on my list, I was snappy.  Not so fun to be around!

All of our house projects are taking a lot longer than we anticipated.  We have hit some speed bumps with the house, but that is just part of any remodeling project!  But you know what?  I have let go of the lists (not all of them ;-))) and it doesn't bother me that the house projects are taking longer.  A lot of things don't bother me like they use to.  This 'letting go' business turns out to be really good for my heart.  And my family appreciates a wife/mama who isn't so project oriented all.of.the.time.

I thought I would post a few photos of the play room.  It's taken quite a while to get to this point, and it will still take me at least another month to get it finished.  But, it's further along than it was when we moved in {wink}.

IMG_4505

IMG_4509

IMG_4508

IMG_4506

IMG_4511

There is no natural light in this space, so it's hard for an amateur like me to get decent photos!  You can see I still have a lot to do!

I am curious to see how the door knobs turn out.  They don't lock, they act as a handle to open the doors.  Once I paint the oak doors, I will wax the doors and the door knobs, I will let you know how it turns out.

The flooring all comes up soon so I am trying to paint everything now while it doesn't matter if paint gets on the floor.  In the mean time, the girls love playing in the space and I can't wait to get it finished for them.  There is something so sweet about siblings playing together, even if it only lasts for 30 seconds at a time ;-)

VANITY AND CHAIR || before + after

You know how there are certain things you think will just never happen to you?  For no reason, other than you just don't think they will happen.  Well, my computer crashed last week and of course the only thing I ever backed up was Quickbooks (which is good since I would be in a deep state of depression if I had to muddle my way through re-entering accounting for our personal and two business accounts....ugg.) Anyways, I am slowly getting applications re-installed on my computer and now have a fancy-smacny external hard drive attached at all times.  Lesson learned!

I had some great before + after photos of this darling vanity and chair.  Of course I lost all of those photos and haven't yet re-installed my photo editing program.  But, I still thought I would show a few 'after photos'!

IMG_4405

I picked up this darling vanity and chair at a garage sale a few weeks ago.  It was orange and had IMG_4405

I picked this darling duo at a garage sale a few weeks ago.  It was orange, brown and white.

IMG_4408

I used OLD WHITE {Chalk Paint®} for the vanity with one coat of CLEAR WAX. I sanded the edges lightly because this piece had A LOT of paint layers.  I wanted to add to the history of the piece, not make is look like it was brand new.

IMG_4406

I used LUCKETT'S GREEN {MMS MILK PAINT} without the bonding agent.  I sanded the edges and applied a CLEAR WAX.

IMG_4410

I sell fun knobs at the studio.  I snagged this darling white flower knob for a bit of a feminine touch.  Right now this cutie sits in my bedroom.  I am not sure if it will stay there, but it's the perfect spot to keep my planner and journal.

In other news, I thought I would show a few photos of the basement progress.....

IMG_4411

Matt is busy modifying the cabinet so it can house the TV.  He moved windows and doors so we are changing the layout a bit.  He is going to re-purpose the mantel {taken from a job years ago} and then paint all of the cabinet and woodwork white....

IMG_4412

It's a bit of a mess, to say the least, but we are almost ready to start cleaning up and prepping for paint {walls,ceiling and cabinetry}.  Yahoo!

IMG_4413

The play room is right off of the great room.  I am getting ready to paint the walls and then remove the flooring.  Addilyn already loves cozy-ing up in their soon to be book nook.  Love that girl!  And so fun to create a room just for the girls!  I can't wait to start getting some work done in there!

OK, I am off to work on my computer a bit more, super fun.

xoxo~Darci

PAINTING FLOWER POTS

IMG_4088

The sun started to make a more regular appearance a few weeks ago.  It was just the inspiration I needed to start sprucing up the outside of our home!  We have a lot of projects for this summer so I didn't want to rush out and buy new flower pots when I don't yet have an overall plan together.  So, I thought I would rummage through what I already have and just make some improvements ;-)  I have painted flower pots with Chalk Paint® before.  It's such an  easy way to spruce up an old pot!

First, I cleaned my pots and set them up outside to start painting.

IMG_4090

I used COCO.  My pots already had some texture, so I was going for a concrete/stone look.  After two coats, I realized they looked to 'clean and even', I wanted the pots to look a little aged…..like me ;-)

IMG_4091

I started with making a wash with the GRAPHITE (adding water to the paint to thin it a bit) but I didn't like that look so I repainted the section with COCO.

IMG_4093

I ended up making a wash with OLD WHITE and I like the results much better.  I dipped the paint brush is the paint, them into a bowl of clean water.  There are a couple of different approaches when it comes to color washing, but this approach worked great for what I was doing!

IMG_4353

Now all of the pots look a little better grouped together and it only cost me an afternoon and a small amount of paint!

IMG_4356

I don't wax any of my outside pots.  Just paint, plant and set them out.  All of my painted pots (I have painted my flower pots for the last two years) have held up perfectly!

IMG_4355

Now you know what to do with all of those mis-matched flower pots you have laying around!

IMG_4357

With the weather being sooooo perfect (sunny and 70's) we have been spending a lot of time outside.

IMG_4318

The girls love exploring and helping me outside.

IMG_4331

We have this amazing (huge) front yard.  Hopefully in a few years we will fence part of it and add sheep and goats to our little family.  I am pulling for a few goats now, but I can't quite convince Matt of how great they will be.  Hmmmmm.

IMG_4327

Oh and there is a lot of 'this' that happens outside after the big guy gets home from work.

Melts my heart to have such a sweet guy who loves his three girls so fiercely!

IMG_4314

Have a great day friends…...and enjoy the sunshine!!!

HAND MADE CHALK BOARDS

I bet most ladies love chalk boards as much as I do!

They are so fun and come in every shape, size and color.  Perfect for menus, quotes, directions….anything looks a little sweeter when written on a chalk board.  I love to make chalk boards!  If you haven't made one, here are a couple of easy tips to make your own chalkboard….on virtually any surface!

IMG_4340

I usually use cabinet doors for my chalkboards (mostly because we always have a few extra lying around).  But, I have seen some darling chalkboards made on serving trays, platters, windows, walls and more.  Just use what you have (or find at Goodwill)!

IMG_4337

I usually have 1-2 quarts of chalkboard paint on hand.  You never know when the inspiration might strike ;-)  I typically paint the frame of the cabinet door.  I use Chalk Paint® and wax.  It's super easy and I know it will cover beautifully.  I sand whatever I am painting, and then give it a good wipe down.  You don't want any dust in your paint!

IMG_4339

After I have painted the frame, I tape the edges.  It's so hard to get a straight line without taping.  It usually takes 2-3 coats of the chalkboard paint.  Each brand of chalkboard paint has their specific directions, the brand I had requires 4 hours dry time before re-coating.

IMG_4340

Once the chalkboard paint is completely dry, you will need to prime the chalkboard.  Rub the chalk in both directions to completely cover the chalkboard surface.  This ensures that the writing will not stay imprinted into the chalkboard.  Here is a picture of when I primed Savanna's chalkboard wall.

IMG_4347

I have a lot of chalk boards scattered through out the house, and a few for sale at every event. I am out of 'extra' cabinet doors so I am going to have to start getting creative!  This one is for a customer's granddaughter's room….so fun for a little girl to have her own little space to create!

Have a great week!!

A LIVING ROOM UPDATE

I thought I would post a few photos of the living room.  It's slowly coming together and I am loving everything about it!!

IMG_4291

Our living room furniture arrived a few weeks ago.  I still have  A LOT I want to do in this room.  I am amazed how fast time flies!  Kiddos and moving seem to make me realize it even more. :0) When I would tell someone that we moved 2, 3 and now almost 4 months ago, I realize how time is gone in the blink of an eye!!  And it doesn't seem like we have done much to our new space….the to-do list is long and we better get cracking!  With little people in our lives, we spend a lot more time playing and adventuring than just working on the house {like we use to}.  But, I wouldn't have it any other way!

IMG_3826

This was the living room when we moved in.  Clean, and great natural light.

IMG_4294

I painted the walls a soft gray, and added blue and green floral curtains and the room looked quite different with just those changes.  The bay window had an great upholstered cushion, however, the fabric didn't go with my new color scheme.  I knew I couldn't sew one, so I tried painting it with Chalk Paint!  It took three coats, but it covered beautifully! It isn't soft, I would compare the feel to that of an outdoor furniture cushion. But it doesn't crack when you sit on it and it serves is purpose beautifully!

IMG_4298

I am in love with the new sofa and chairs.  The cushions are down and super comfy, and the fabric is a soft linen color with a subtle herringbone pattern.  It has enough pattern that I don't worry about noticing every bit of dirt, but it's still light and keeps the room feeling lighter.

IMG_4197

Remember our beautiful cherry mantel?  Matt really loved it but it was just a bit too dark for me.  While he was gone at work one day, I painted it with Chalk Paint®.  That's one of the beauties of Chalk Paint®…..I painted 3 coats of paint and waxed it in one day.  I didn't need to prime or prep the existing wood…..I love this stuff!!  I painted the mantle COUNTRY GREY, a soft grey with a bit of green.

IMG_4296

Matt wants to replace the stone and I want to add some art work above the mantel, we will see when that happens!

IMG_4300

I bought two matching oak tables from this little hole-in-the-wall space.  They were in great shape, but very dated with a yellowed varnish- very 80's oak.  I wanted more of a chocolate brown color to compliment the oak floor.  I used MMSP MILK PAINT to act as a wash/stain.  I sill wanted the wood to show, I just didn't want to go through the hassle of stripping, sanding and refinishing the oak tables.  I used the color CURIO.  I applied one coat and sealed it with furniture wax.  It was done in less that one hour….love that!

IMG_4297

And we still have A LOT of work to do in the house!  This is the view into the dining room and kitchen.  You can see all the way through that we have all of our new interior doors stacked in the kitchen.  Matt needs a place to spray all of them, so they just wait.  We both really enjoy having projects. but there comes that time with every project that you just want to be done!  We haven't reached that point yet, hopefully we are a lot further along before we do ;-)

Enjoy the sunshine friends!!!!

THE BABY IS 1 || & I painted the high chair

My sweet baby turned 1 last week and we had a little party on Sunday to celebrate.

IMG_4230

This little one is sweet and spunky and getting easier by the day.

IMG_4235

I had an old wooden high chair my mom gave me a few years ago.  It had a great shape, but the finish was worn and yucky {think 70's-yellowed-stain}.  I had wanted to paint it, but it fell low on the priority list.  With the birthday party coming up, I figured it would be a good excuse to paint it!

IMG_4264

I used Chalk Paint® {of course;-}.

I mixed Antibes Green and Old White…..3 parts Antibes Green to 1 part Old White.  By adding the Old White, it softens the green.  It's cheerful but not too bright.

IMG_4266

I distressed the edges a bit and 'dipped' the feet in Old White.

IMG_4270

I waxed it with Clear Wax and called it finished!

IMG_4271

For the 'dipped feet', I taped with masking tape for a crisp edge.

IMG_4261

I set the monkey in the high chair and tried to capture some cute poses.  I took a lot of photos, but none really seemed to capture her personality.  Next time!

You have probably noticed, but I am really getting hooked on mixing colors of the Chalk Paint® and Milk Paint.  Both lines of paint come in beautiful colors, but it really opens the door to color when you start mixing….so fun!


A NEW 'BASICS' CLASS || and a few projects

I hosted our first BASICS class this week and it seems to be a very popular class!

I had to turn a few ladies away {which I felt really bad about!} but I promised to host 1-2 BASICS class each month.

IMG_4203

The next BASICS is Wednesday, May 14th, 7-8:30pm.  I have 4 spots left if you want to join!

IMG_4204

The tuition is $45. At the class, we learn two different gorgeous finishes with chalk paint® and soft wax by annie sloan that you will use to transform your furniture, fixtures, cabinets and walls:  distressed and washed method.  You will leave armed with samples you’ve created of each finish, a notebook full of ideas,  and the confidence to tackle all your projects.  

IMG_4206

And, in other news, I have A LOT of half finished projects going on around the house.  The girls have been sick, Matt still isn't healthy and back to himself, and it's been so rainy…..to say the least, I haven't been too motivated to work on projects!

IMG_4197

While Matt was gone one day, I did paint the mantle. Matt loved the Cherry mantle.  It is beautiful!  But, I ordered darker furniture and I really want the room to feel light.  So I painted it ;-)  I think it looks really pretty, I will post pictures soon.  Matt actually likes it too!  There are some projects I just have to tackle when he is gone….then he can't stop me!  Ha….does anybody else have that problem?!?  I know there are other ladies out there who do the same thing ;-)

IMG_4200

I also started painting in the entry way.  I am painting the railing to match our new, black, glossy doors.  I am thinking of wallpapering or hang in fabric on this big, blank wall leading to the basement.  Thoughts?  I have always wanted to hang wallpaper in my home.  I have chosen wallpapers for different clients, but never been able to commit for my own home.  I will let you know!

BEFORE + AFTER || a darling dresser

A few weeks ago I bought a darling dresser at a thrift store.  It wasn't necessarily a screaming deal, but I loved the lines of the piece.  I decided to purchase it and it has been sitting in the garage waiting for a little makeover.

IMG_3981

It is a heavy one, so pardon the picture of it on it's side!

IMG_4164

And here she is all painted and cleaned up.

IMG_4174

I painted the inside of the drawers ANTIBES GREEN {Chalk Paint®}.  I know it takes extra effort to paint the insides of the drawers, but I love how it really finishes a piece off.

IMG_4171

The pretty blue is actually a mix of three different Chalk Paint® colors.

2 parts Louis Blue

2 parts Provence

1 part Florence

IMG_4159

I finished it off with a coat of clear wax.  I am starting to work on pieces for my little Spring Sale, but it will be listed for $345 if you are interested in purchasing earlier ;-)

IMG_4168

And this was the scene outside while I was painting.  Little Miss was playing in the pond and my sweet hubby was recuperating from spending his birthday in the hospital.  Poor thing.  He had an accident with his table saw first thing in the morning.  The girls and I piled into the car to take him to the ER.   I didn't know how bad it was {he kept his hand wrapped in a towel}.  He ended up having surgery and finally coming home around 10pm.  It was a rough day but we are so thankful for great friends who stepped into help and for God's provision!

THE STUIO || + a little giveaway

Have I mentioned how much I love having the design studio so close to home?  In Carlton, we lived about 3 blocks from my studio.  Not bad.  But here, it's a 10 second walk.  Awesome.

IMG_4050

We do a lot of bike riding on Fridays.  It's fun for the little miss, and we can easily greet customers when they drive up!

I thought I would show you a few photos of the updated studio space.  I still have lots of projects, but at least the space is 'presentable'!

IMG_3827

Remember the 'BEFORE'?

IMG_4057

We started with new paint on the walls and ceilings and a new {laminate} floor.

IMG_4054

The floors have a lot of variation in color which hides dust and dirt well.  And in a working studio, that is a big bonus!

IMG_4052

We switched out a few of the lights.  Matt still has to hang a little chandelier in the entry…..always projects ;-)

IMG_4024

We have a handful of cabinet doors painted in various Chalk Paint® colors.  I still need to paint 15 more doors!

IMG_4025

Not to mention I need to paint another 18 to show all of the MILK PAINT colors!

IMG_4021

I painted a few banners on the wall showing the different Chalk Paint® and MILK PAINT colors.

IMG_4026

I also have trim pieces painted with each color.  It really helps to see the paint applied in different ways.

IMG_4071

Matt was going to build shelves for the wall.  He mentioned using this old hutch top for a shelf instead!  Perfect!  I din't have a use for it, so, I painted/waxed/distressed and it saved him the time of having to build shelves.

IMG_4029

Lots of Spring colors!

IMG_4028

Do you see how dirty those daffodils are?  Do you know how to get the mud off of the petals??  Every time I try I rip the petals!

IMG_4068

And just for fun I thought I would do a little Miss Mustard Seed Milk Paint giveaway.  Trying saying that 10 times!!

IMG_4066

A bar of spearmint and green tea soap to clean your hands and brush when you are done painting.

A sample size of MUSTARD SEED and KITCHEN SCALE Milk Paint.

Fun, right?  I am limiting this giveaway to local gals.  I want to be able to drop it off and give you tips on how to use Milk Paint {if you have never used it}.  Just leave a comment on the blog telling me what you think you will paint with Milk Paint!  I will draw a winner Sunday and deliver next week.

Have a wonderful weekend!!

A LITTLE UPDATE || our organized chaos

We survived our move!  It almost got the best of me!!  Packing, cleaning, moving two businesses…. and all with two little helpers was rough.  Matt says our next move will be to a nursing home ;-)

Matt is busily working on making my new studio space 'pretty'!  I am so excited to have the shop/studio so close to home.  I will be able to devote more time and energy into helping customers and painting projects.

IMG_3827

This is what the space looked like last week.  It's a really neat space, I can't wait to show you the finished project!

IMG_3828

Matt is painting the walls today.  The walls and ceiling will be a really soft gray…..

barn_light_14_inch_original_gooseneck_shade_975_galvanized

I got these cuties for the wall mount lights, there are 2 of them going up the stairs.

contemporary-laminate-flooring

Matt ripped out the existing carpet and is installing this laminate floor.  We wanted to go with a vinyl or laminate.  Both options are easy to clean and can handle water and paint spills….perfect for a paint studio!!

I have a painting workshop this Saturday, so our goal is to have the space ready by then!

IMG_3825

Meanwhile, the rest of the house has 'organized' piles of chaos,

IMG_3826

or, it has nothing.

We sold most of our furniture to our home buyers.  I wanted to buy new furniture for this home so it was a win-win for both of us!

IMG_3829

Once my shop/studio space is set up, and our Main Street property is set up and functioning as a vacation rental {again} we will start to decorate!  Addilyn's room is first on the decorating calendar!  This is what we have so far….pretty bare bones!

Thanks again for all of your patience.

My design clients have been so patient and gracious, my paint customers have been so understanding, my rock-star of a husband has been busily up-packing and helping around the house.  Addilyn spent all day yesterday with her Grandma and I was able to get so much un-packed. Such a blessing-all of you!

I can't wait to share all of the changes with you guys!  And, I will be offering a new line of paint {in addition to the Chalk Paint®}.  So much great stuff in the works!!!  But, for now I need to get painting!!

MOVING THE STUDIO :: and the vacation rental

I feel like we are always moving/building/creating/changing.  I love it, wouldn't have it any other way.  But, with sweet little kiddos in the mix now, we don't have the bug to always move/build/change.   You know?!?  We still love all of that, just don't want it to take up all of our time.

IMG_3783

The new house we are moving into has a great detached garage + upstairs office/studio.

I love working at/creating at the studio.  It's my own little creative space and I love the opportunity to meet new people!  But, it's really hard with two little ones.  So moving the studio to our property is going to be awesome!!  I will have more details about the new studio space once escrow closes {next week}.

With all of the moving changes, we have decided to turn our Main Street property back into a vacation rental.    We have had vacation rentals in Carlton for 6 years now!  Crazy how time flies! This past week, we have been slowly making the changes to turn it back into a vacation rental.

IMG_3785

The living room is slowly coming together.

I sold all of furniture last year when we turned this house into a studio {of course}!  So I am buying new furniture and moving things over from our house.

IMG_3791

This is what the dining room currently looks like.  Lots of work ahead of us!

IMG_3797

I have the kitchen stocked, cleaned and ready for renters!

IMG_3799

The kitchen takes me the longest to clean after we have had renters….at least 1 hour!  But nobody wants to vacation at a home with a dirty kitchen!!

IMG_3793

Matt still has to build a bed for the upstairs office, and convert the work room back into a bedroom, I have to make changes to the website, yada yada yada.  Seriously, we are crazy!

But, I know in the long run it will be much easier, and I can be more productive, to have the studio where we live.

Life is good, I am so very blessed.  Hard work just keeps me sleeping good at night and not having to work out!