ST. PATRICKS DAY:: some green inspiration

Good morning friends,

It's so hard to believe that February is almost over!

March is on my mind.  The newness of Spring, planting cold weather crops, darling bulbs poking their heads through the mud...more on all of that later.

In the mean time, I thought I would share a few St. Patrick's day ideas I have found on Pinterest......I plan on implementing these fun ideas in the Haney household next month!

0031

Such a cute way to start the day off right for the little ones!

014

She even included a free printable here.

you

And what about this cute idea....she included a free printable here.

c9b73925669f47b716bd7aaa56d4ea87

Another breakfast idea here....

IMG_1301

Classic St. Patrick's day dinner.  This recipe is a crockpot recipe.....who doesn't love throwing food in the crockpot and letting that precious little appliance do all of the work??

Crock-Pot-Corned-Beef-and-Cabbage-682x1024

And for dessert.....adorable cupcakes from here.

a520451a6b85cedae6f0b48547510821

One last cute treat idea from here....

IMG_8651

 Have a great weekend friends!!


SPRING ENTERTAINING CLASS :: a night of fun, friends and tasty food!

Hello friends!

I am so excited to announce that we will be hosting another ENTERTAINING CLASS.  We had so much fun with the FALL ENTERTAINING CLASS, that we felt another one was in order!

I really do enjoy opening up my home to others.  Entertaining isn't about having everything perfect and serving amazing food, it's about enjoying the company of those around you.  During the class, we talk about fun and easy decorating tips, we eat good {and easy to prepare} food and we discuss ways to make entertaining more enjoyable.  Since Easter is right around the corner, we will also be talking specifically about decorating for/hosting an Easter get together.

Last Easter, we hosted a brunch right after church.  The weather was amazing {for the Pacific Northwest in April!} and we celebrated the death and resurrection of our sweet Saviour.  I have quite a few wonderful memories from last Easter, but my favorite, was watching my little sweet pea enjoy time with our family.

IMG_1850

Do you have a favorite Easter memory or tradition?

If so, I would love to hear about it!

In the mean time, the details for the class are below....

springclass header

Spring is all about celebrating the fresh newness of life with lighter food, family, friends and simple style.  For our Spring entertaining class, Darci will share tips and show you simple ways to enjoy entertaining {in style} and use beautiful Spring produce to make displays for your home and parties.  We all know that Spring parties are not complete without fresh food.  Darci will prepare a complete seasonal menu, perfect for any Spring party.  The menu features classic Spring dishes, with a Pacific Northwest twist......

  • baked brie with crackers and fresh fruit
  • spinach & strawberry salad
  • shrimp scampi {chicken will be available for the non-seafood eaters}
  • home made herbed ricotta on toasted baguette
  • lemon mousse with fresh whipped cream
  • drink

bannerlinen When:

March 21st & 22nd, 6pm-9pm

 Where:

our back patio, covered from the elements and next to the raging fire {646 West Grant Street, Carlton}

 Cost: 

$55 per person

Includes:

  • tips on simple Spring decorating
  • recipes
  • a take-home decoration for your Easter table setting
  • appetizers
  • dinner
  • dessert

RSVP:  

info@mdhaneyco.com or call 503.857.8176.  

I can't wait to hear about your memories and traditions!!  Life is worth celebrating!!

xoxo~

Darci


DOUBLE CHOCOLATE COOKIE WITH SEA SALT

double chocolate cookie

 I may {or may not have} eaten three of these warm, chocolate-y cookies right out of the oven.  They are so good!  If you are looking for an extra special chocolate treat, these are super easy cookies to make.

The sprinkle of sea salt balances out the sweetness and adds just a bit of crunch.  A sweet friend, just brought me a bag of sea salt from Hawaii, it was just perfect for these cookies!

double chocolate cookie

Ingredients::

1 c all-purpose flour

1/4 tsp baking soda

1/8 tsp salt

5 Tbsp unsalted butter

7 Tbsp unsweetened cocoa powder

2/3 c granulated sugar

1/3 c packed brown sugar

1/3 c plain yogurt or sour cream

1 tsp vanilla extract

1/2 c semi-sweet chocolate chips

sea salt for sprinkling

Instructions::

  1. In a small mixing bowl, whisk together flour, soda and salt. Stir in chocolate chips. Set aside.
  2. In a medium saucepan, melt butter. Remove from heat. Stir in cocoa powder and both sugars. The mixture will be very grainy and thick.
  3. Add yogurt and vanilla extract. Stir to combine. Let the mixture sit 5-10 minutes, so that the chocolate chips don't melt.
  4. Add dry ingredients with chocolate chips, stir until all is moistened and there is no streaks of flour in the dough. Do not over mix.
  5. Refrigerate the dough for 30 minutes {or up to 2 days} for puffier cookies.
  6. Pre-heat oven to 350 {I used convection, so I set the oven to 325}
  7. Drop by tablespoons onto prepared sheet. Sprinkle each ball of dough with sea salt. Bake for 8 to 10 minutes. Cool 2 minutes on the sheet, then gently transfer onto a wire rack to cool completely.

Enjoy!!  Preferably with a cold glass of milk!

xoxo~

Darci

THIS OLD HOUSE MAGAZINE :: our attic remodel

Last winter, our cottage attic remodel was featured in the Jan./Feb. issue of  This Old House magazine.

It was such a treat to meet the photographer and stylist.  They were both extremely talented and professional.  All of the photos are courtesy of This Old House/Susan Suebert.

00-attic-remodel

The stylist added added her own little touches to the room.  Don't you like how she added the green?  The way the photographer and her team captured the lighting was incredible!

05-attic-remodel

They spent about 5-6 hour capturing images of just the attic space.  Eventually they moved outside to photograph the exterior.

06-attic-remodel

03-attic-remodel

This is the little sitting area between the bedroom {now the LOFT} and the office.

02-attic-remodel

 This is our office, this is the shot looking from the office into the bedroom {LOFT}.

04-attic-remodel

What a fun experience to get to 'work with' This Old House.  They were so considerate and it is such a joy to watch someone work, when they love what they do!

OUR COTTAGE :: the loft

IMG_2550.jpg

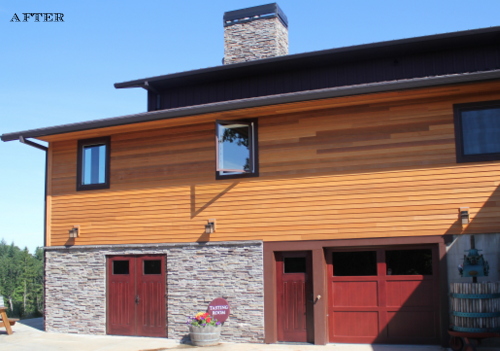
 I thought I would post a little update on our sweet little Main Street Cottage.

Even though this little gem needed a lot of work, she caught our eye about 6 years ago.

We approached the owners, letting them know that if they ever wanted to sell, we would be interested in buying.  They were actually considering selling anyways!  They wanted quite a bit for the house, and at the time, it was just out of our budget.  Fast forward about 1 year....they had listed the house, and were ready to move to Eastern Oregon.  They lowered the price {a little} and we decided to purchase it.

before

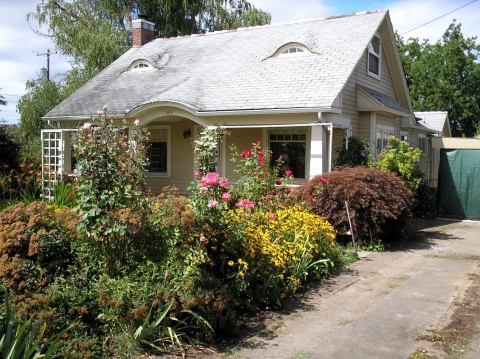
 The home had/has charming features.  However, it needed A LOT of work.

We would save up cash, and fix an area.  That cycle took us about 4 years, but we finally got her fixed up!

during

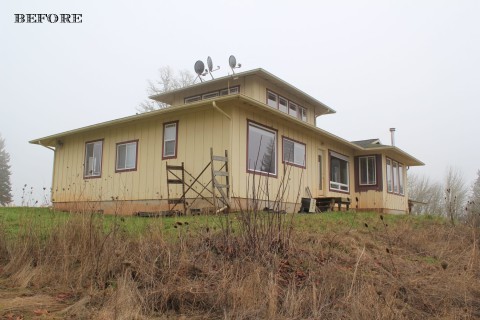
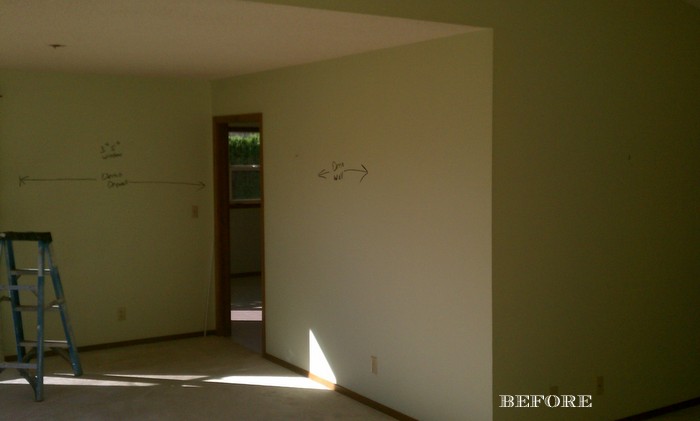
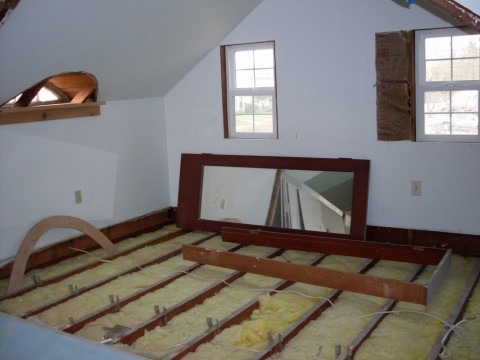
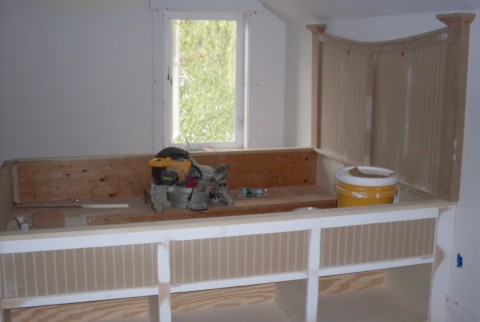
 Below is a picture of the attic space 'BEFORE.'

The space was un-used and had floor joists that were on top of the attic roof.  If I remember correct, there was about 5'5" of head space.  Just fine for a shorty like me, but challenging for anybody over 5'3"!

attic: before

 Matt gutted everything.

We brought the wiring and insulation up to code, framed for a bathroom and just worked away as we had the time and money.

attic: framing

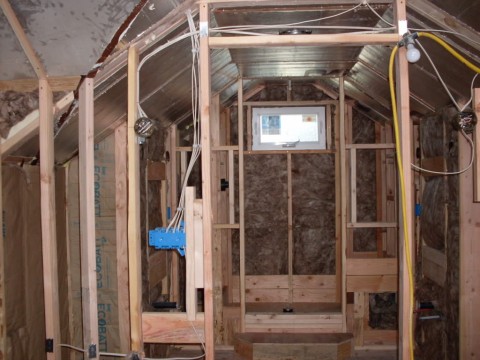
 Matt hung the drywall, then applied a faux plaster finish over the drywall.  It gave the walls an old house look and feel, but with out the mess of lath-and-plaster.

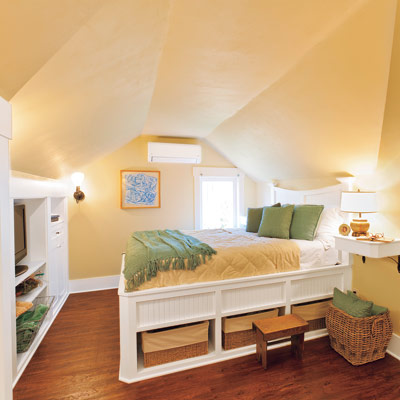
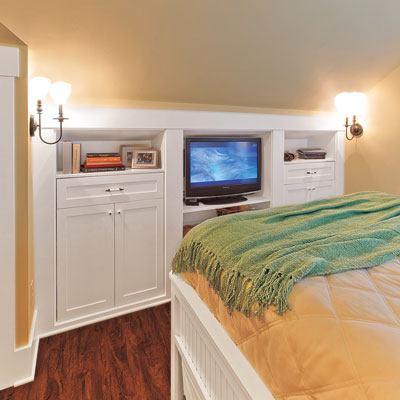
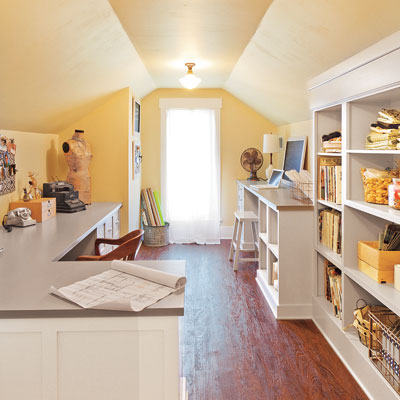
Then he went to work on all of the built-ins.  Since the space was attic space, we had to be creative for storage needs.  We couldn't get a bed up the stairs, so Matt built a bed and then carried the mattress up a ladder and through the tall upstairs office window!

attic: during

 It took about 6 months to complete the upstairs bedroom and bathroom addition.

Now, we are turning into the upstairs suite into a nightly rental.

Instead of guests renting the entire house {as a vacation rental}, they will just be renting the upstairs bedroom/bathroom/seating area.

I am still fine tuning the space, but thought I would post a few pictures.

bed

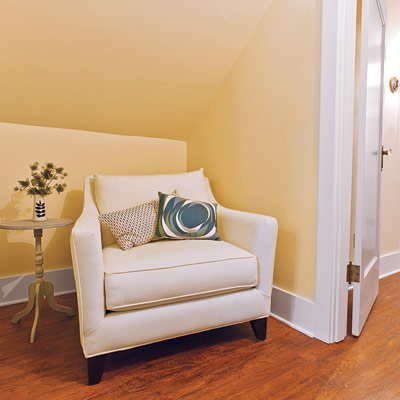
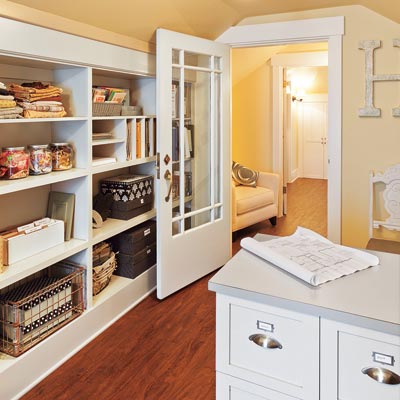
All of the built-ins make for such a cozy space!

IMG_2555

  Plenty of linen storage.

IMG_2557

IMG_2561

IMG_2567

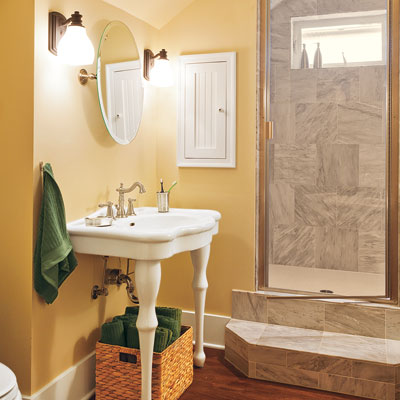
 Double vanity, linen storage, walk-in marble shower and a water closet.

All that's missing is a huge soaking tub!!  We really considered adding one!!  However, since the new bathroom was built in the existing space of a 1938 cottage, we didn't want to take the chance of adding the additional weight.   Plus, we didn't have an 'un-ending' budget!

IMG_2545

Next week I will post the photos that This Old House took of our upstairs space.  It was so fun to watch them at work and see the amazing images they captured!!  It takes true talent to produce/photograph space for magazines, and they were amazing.  Anyways, more on that later.

Until then, have a lovely weekend!!

chocolate chip cookies :: soft and chewy

cookie

 We really enjoy our cookies here at the Haney household.

I thought I would share my go-to chocolate chip cookie recipe.  It works perfectly every time.  Even if I leave the sweet little darlings in the oven for too long, they still taste good!

cookie

Chocolate Chip Cookie

2 sticks unsalted butter, COLD, cut into 1/2" cubes 
3/4 cup granulated sugar 
3/4 cup packed brown sugar 
2 large eggs 
1 teaspoon vanilla 
3 cups all purpose flour  
1 teaspoon Kosher salt 
1 teaspoon baking powder 
1/2 teaspoon baking soda  
2   1/2 good quality semisweet chocolate chips 
In a mixing bowl, using an electric mixer, beat butter and both sugars just until creamy. Don’t overbeat. Add the egg and vanilla and beat just until incorporated. Stir together flour, baking soda, baking powder and salt. When thoroughly mixed, add to batter and stir just until blended. Stir in chocolate chips. Place over sized dough balls on parchment lined baking sheets { I like to use an ice cream scoop.}  Chill dough balls for at least 30 min before baking.  **If you don't have room in your refrigerator for the baking sheets, you can chill the mixing bowl full of dough for 1 hour.**
Pre-heat oven to 375.  Bake times: Put the cookies in a 375 degree oven and set timer for 8 minutes. When timer rings, without opening oven or removing cookies, reduce heat to 325 degrees and bake for another 8-10 minutes or until cookies appear set. Otherwise, you can bake at 350 for 18-22 minutes or until done. 
Makes 12-16, depending on the size.  Just remember, the secret to these cookies is keeping the dough cold!
recipe adapted from here
Enjoy.....preferably warm out of the oven and with a cold glass of milk {wink}.
xoxo~
Darci

BRYN MAWR VINEYARD :: before + after

 It all started with a little {but quite custom!} pump house cover.

Matt received a call, the new owners of this property asked if he could build them a pump house cover.  One thing lead to another and before long we were designing renovation plans and working out the details for this 3800+ s.f. addition.

before

 The existing home sat on beautiful acreage in the heart of the Eola Hills.  There was a small vineyard and a small winery on the property.  The owners bought the property with big plans of fine tuning the art of wine making and creating a family run business.

After several meetings, they decided it would be best to renovate/add on to the existing home instead of demolish the home and build brand new.

The design process took several months, but was so worth it!

Framing

 The outside shell was transformed in a matter of months.

Framing

 The new addition was thoroughly thought out and planned for how the homeowners would use the house.

Progress

 The South side of the house captured the view of the beautiful Eola Hills.

Progress

 The new exterior consisted of clear fir {vertical} siding, cedar board + bat, cultured stone and a standing seam roof.  Classic 'Pacific Northwest' features.

After-front

 The homeowners plan on tackling landscaping this Spring.

After-side


After-back

 The South side of the house completely captures the amazing views, it is truly breath taking!

After

 It's hard to see from this picture, but this is a huge, covered deck.  It's right off the the kitchen.  It has a built-in BBQ, cabinetry and a fireplace.  Did I mention the fact that is also has amazing views?!?

After-deck


New garage doors and man doors.  This area serves as the winery until they build a new one in the next few years.

I will be sure to post some photos of the interior soon.

These clients were absolutely fabulous.

So easy going and down to earth, they were truly a joy to work for.  Thank you for the work John and Kathy!

We are so excited for them and winery venture.  If you are out tasting near Salem, be sure to stop by Bryn Mawr!!

before + after

Kitchen & Living Room Remodel :: before + after

We had the priviledge of just wrapping up a living room and kitchen remodel right before Christmas.

The clients were wonderful to work with {they always seem to be}!

BEFORE-fireplace

 The home is a 1970's RANCH.

BEORE-kitchen

 There was very little natural light and the space was very claustrophobic.

BEFORE-entry

 When you walked in the front door, it was dark halls and walls.

BEFORE-dining

The kitchen was boxed in and separate from all other rooms in the house.

The clients had three must-haves: natural light, extra lighting and openness.

Here is what we came up with....

AFTER-dining

Open, natural light {we added a window and two sky-lights}, plenty of artificial lighting {can lights, island pendants and under cabinet lighting} and a lot of natural materials.

AFTER-kitchen

 Matt built the cabinetry out of cherry, then stained it so it wouldn't have any red undertones.

AFTER-kitchen

 With each kitchen we remodel, we go through a lot of design steps to make sure the clients are getting exactly what they have been waiting for.  I really enjoy the planning process!  Especially for clients who really enjoy cooking and using their kitchen!

AFTER-kitchen

 They chose pre-finished oak floors, a nice compliment to the cherry cabinets.

AFTER-countertop

Isn't the counter top beautiful?!?  It's soapstone and I absolutely love it!   Fortunately, so do the clients.

AFTER-hutch

 This hutch is away from the main kitchen working area.  A place to brew coffee, store cookbooks and gain more surface space for entertaining.

AFTER

 We removed a few walls, this is the view looking from the kitchen into the living room.   Now everything is open and bright!

AFTER-fireplace

 The stone mason laid cultured stone over the existing brick.  Matt built new shelves and cabinets for the living room.

AFTER-fireplace

 We carried {not literally, you know what I mean....right?} the soapstone into the living room and used it for the hearth.

AFTER-hall view

 Now the front entry is light, open and inviting.

This was a really fun remodel.  The clients waited a long time to remodel their space and it was so exciting to see everything come together for them.

Added bonus: they are really nice people.  We have been so blessed over the years to work for fabulous people, not something we take for granted!!

Thanks Mark and Laura!

kitchen remodel

Kitchen Remodel :: before + after

We recently remodeled a kitchen for a wonderful couple.

Last summer, they had Matt build living room cabinetry for their TV and fireplace.  It turned out beautifully!  This summer, they were ready to transform their kitchen.

BEFORE : island

 There was nothing really wrong with their kitchen, they just didn't 'love it'.

I can sure relate to that!

BEFORE: cabinetry

They wanted to change the cabinetry, counter tops and layout.

They wanted the kitchen to be the heart of their beautiful home.

BEFORE: cabinetry

 This is what we came up with:

AFTER

 New appliances, plumbing fixtures, light fixtures, granite, backsplash and custom cabinetry.

AFTER

 Matt built the cabinetry out of cherry, and then stained it {gun-smoke, from Rodda paint}.

AFTER: hood

 The backsplash tile is a beautiful hand made tile from Pratt & Larson.  Pratt & Larson is my favorite.tile.supplier.ever.

AFTER

 We added a WOLF oven, and professional grade appliances, which really steps the kitchen up a notch!

AFTER

 I love the island.

They wanted a place to bake and craft with the grand kids, entertain, watch TV while making dinner and provide extra seating.  The island serves every one of those purposes, and more!

AFTER

 I will forever love apron sinks.

DRAWER


Of course the cabinet builder has captured my heart too {wink}.

Thank you, Jon and Joyce, for the opportunity to work on your project!!  You were truly a delight to work for, and a bright point in our summer!