A BIG GIRL BED || little girl's room

My sweet Savanna turned 4 in April and will start 2 mornings a week of Pre-School this Fall.  It's hard to believe and for the first time in 6 years I will have a little bit of time in the mornings with out little ones!  Every night after she gets tucked into bed, she comes out and asks if she has to go to school.  She wants to wait until she is 5, she wants to stay home with mama.  Bless.  

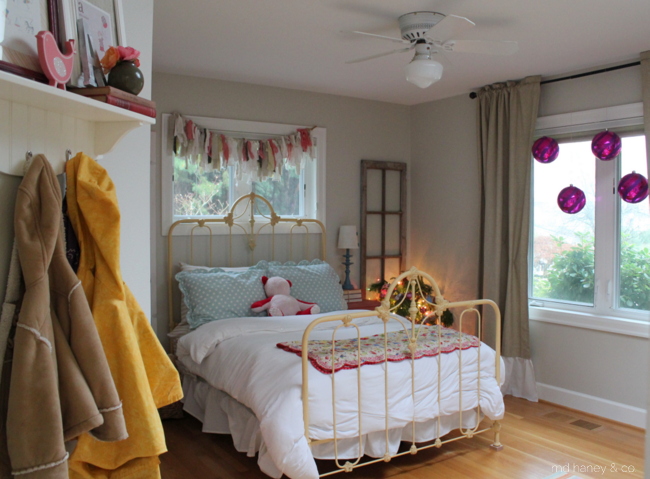
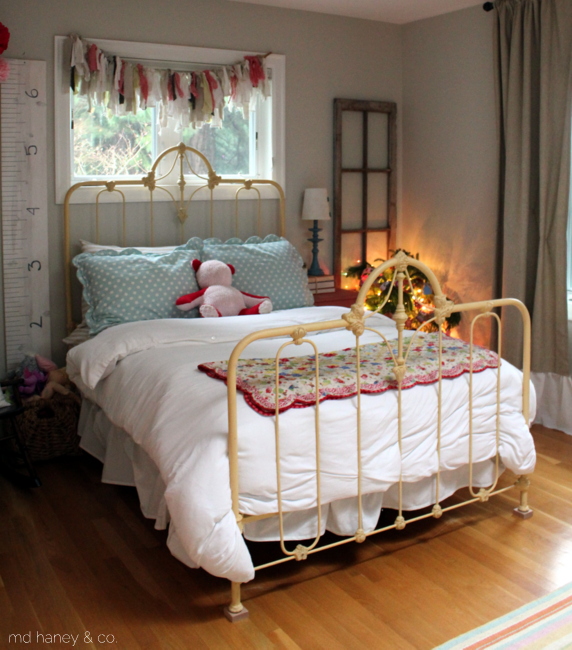
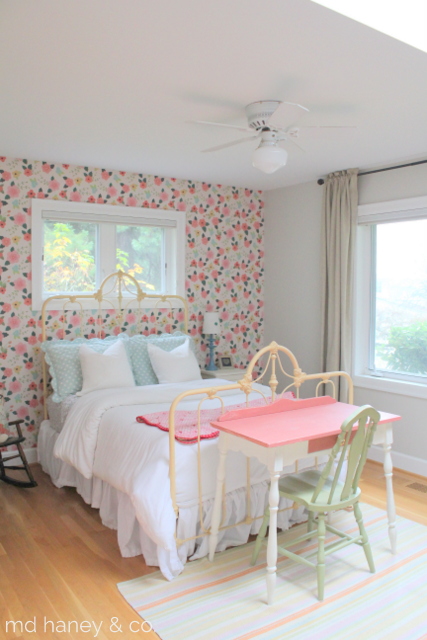
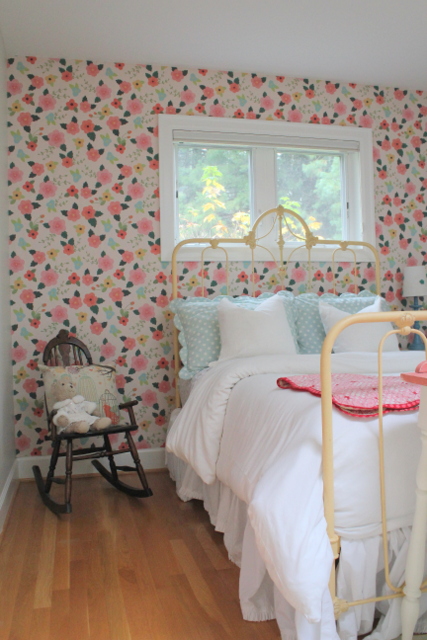
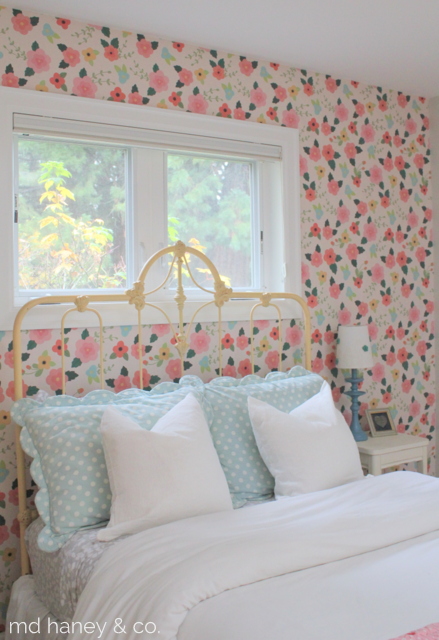
So, we gave her room a little make-over and she upgraded from a Twin mattress to a Queen bed..all in preparation for heading to school this Fall. :)

bd
bed
bedding

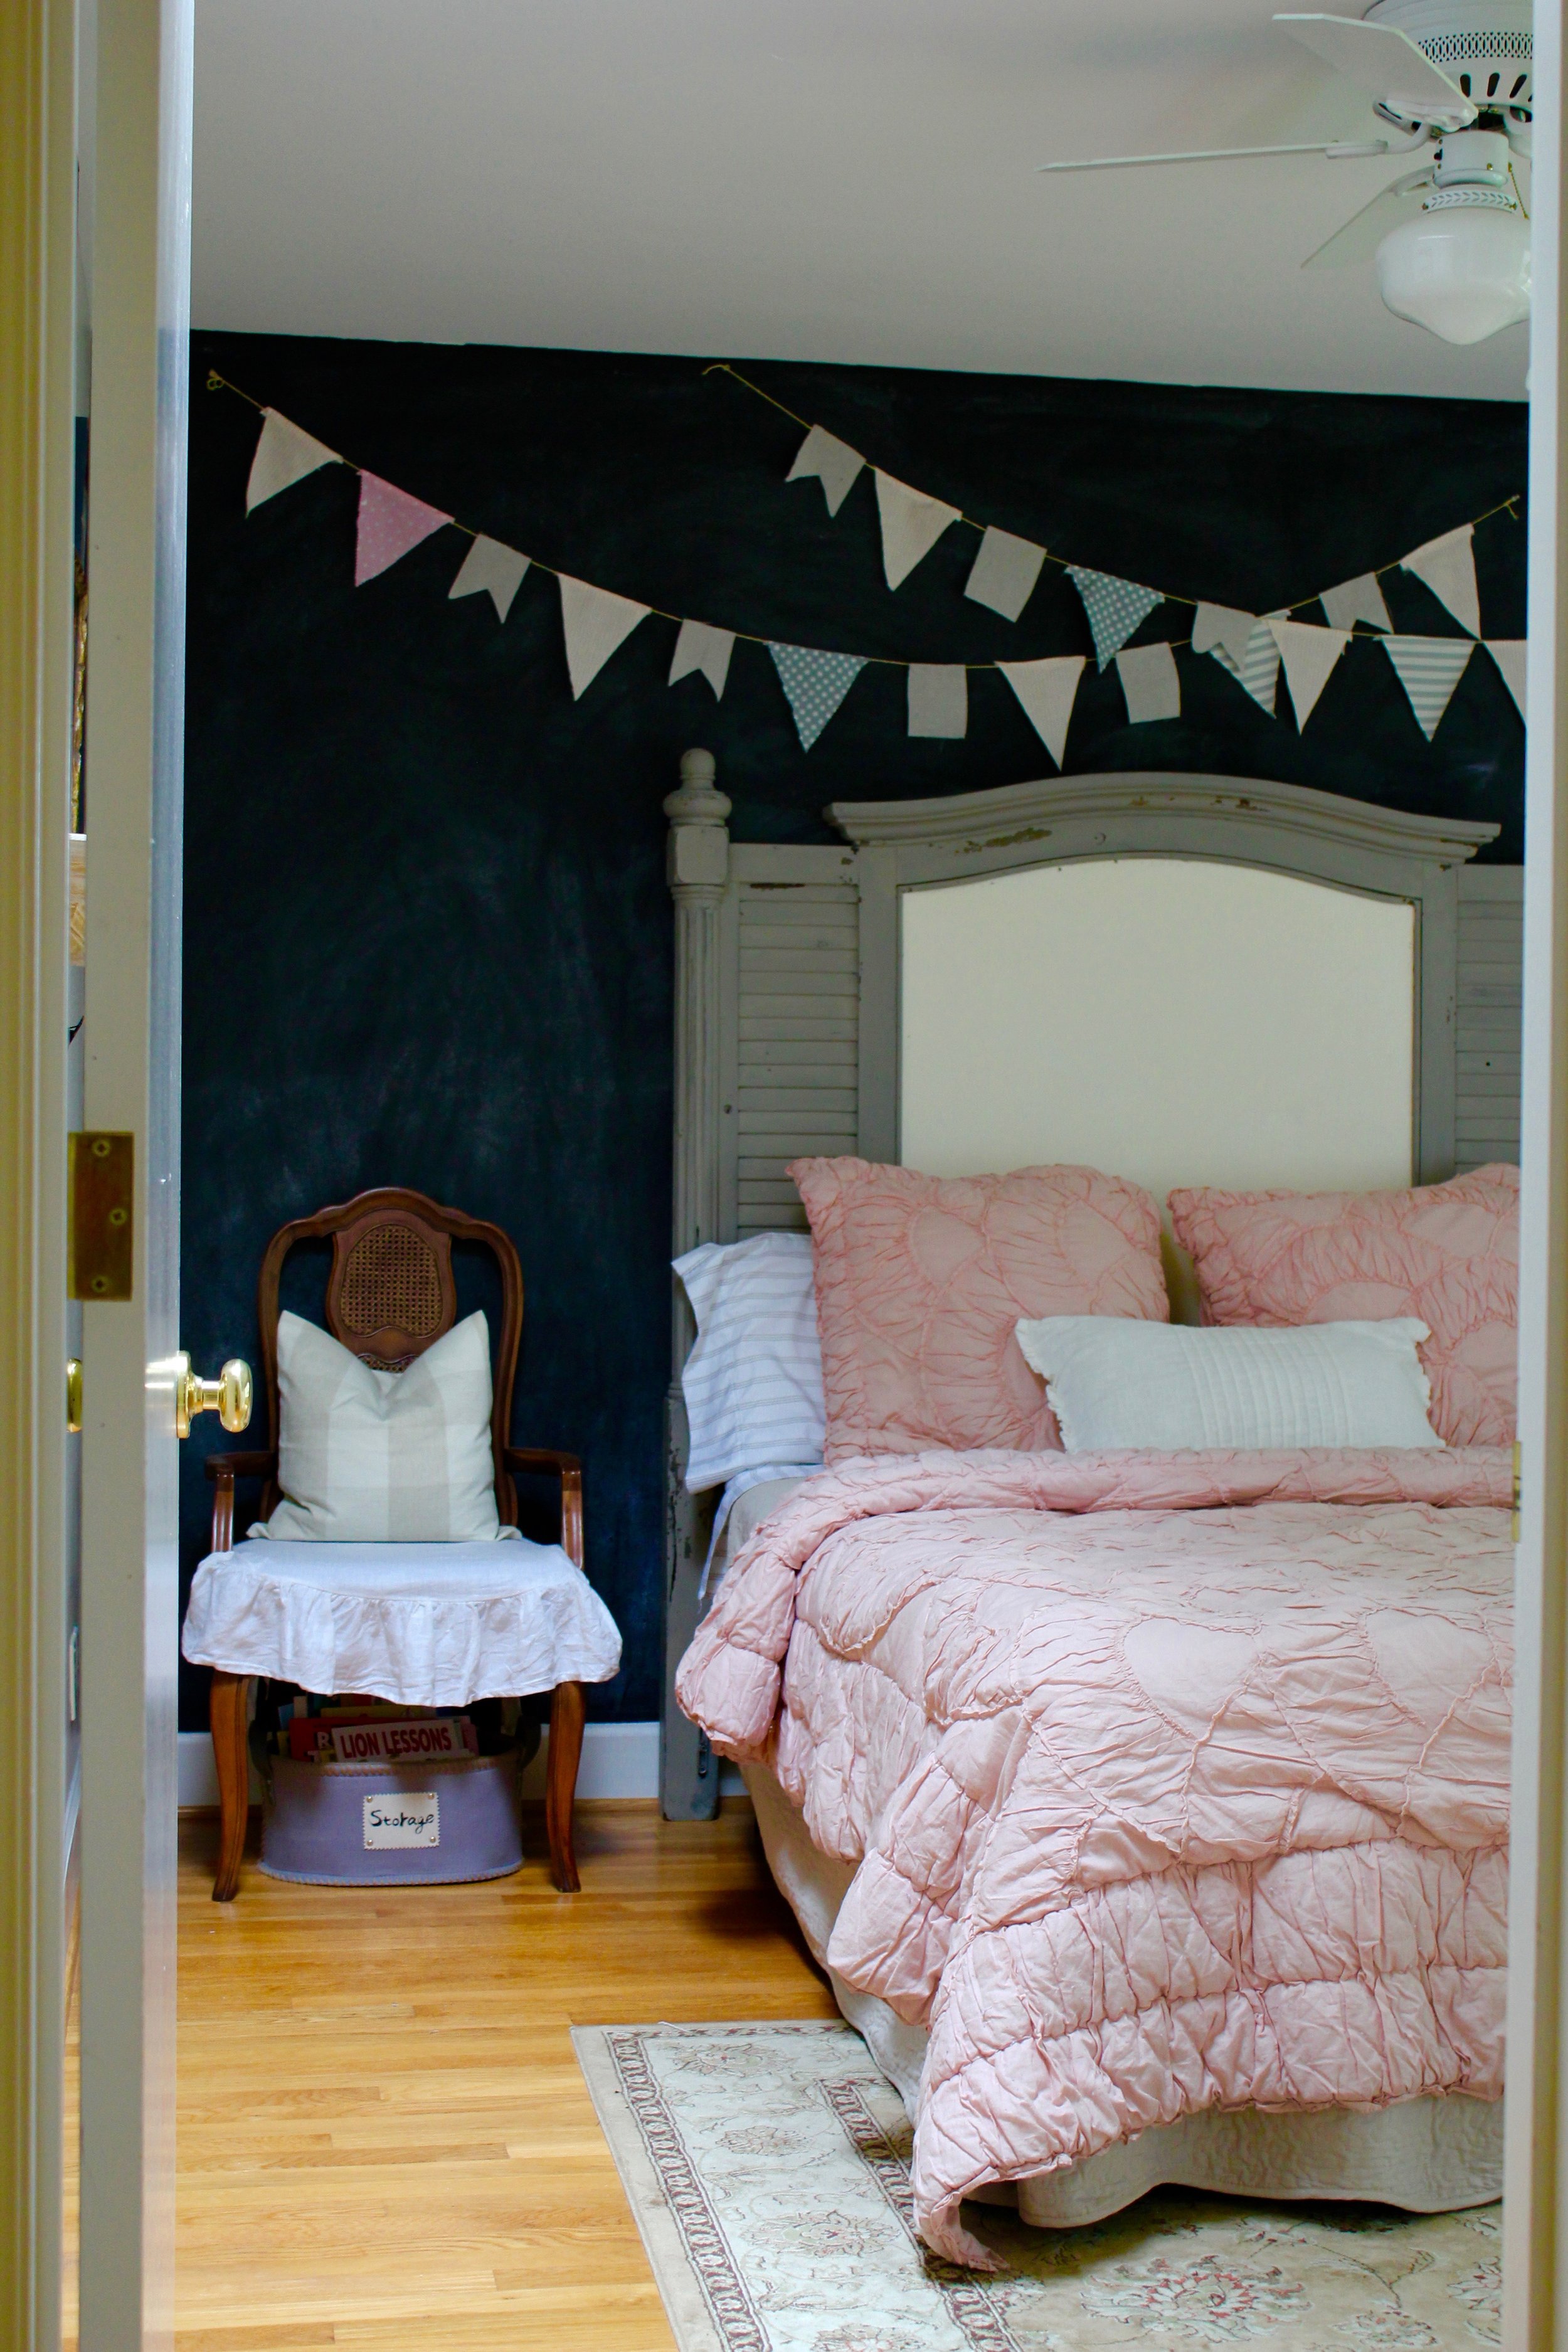
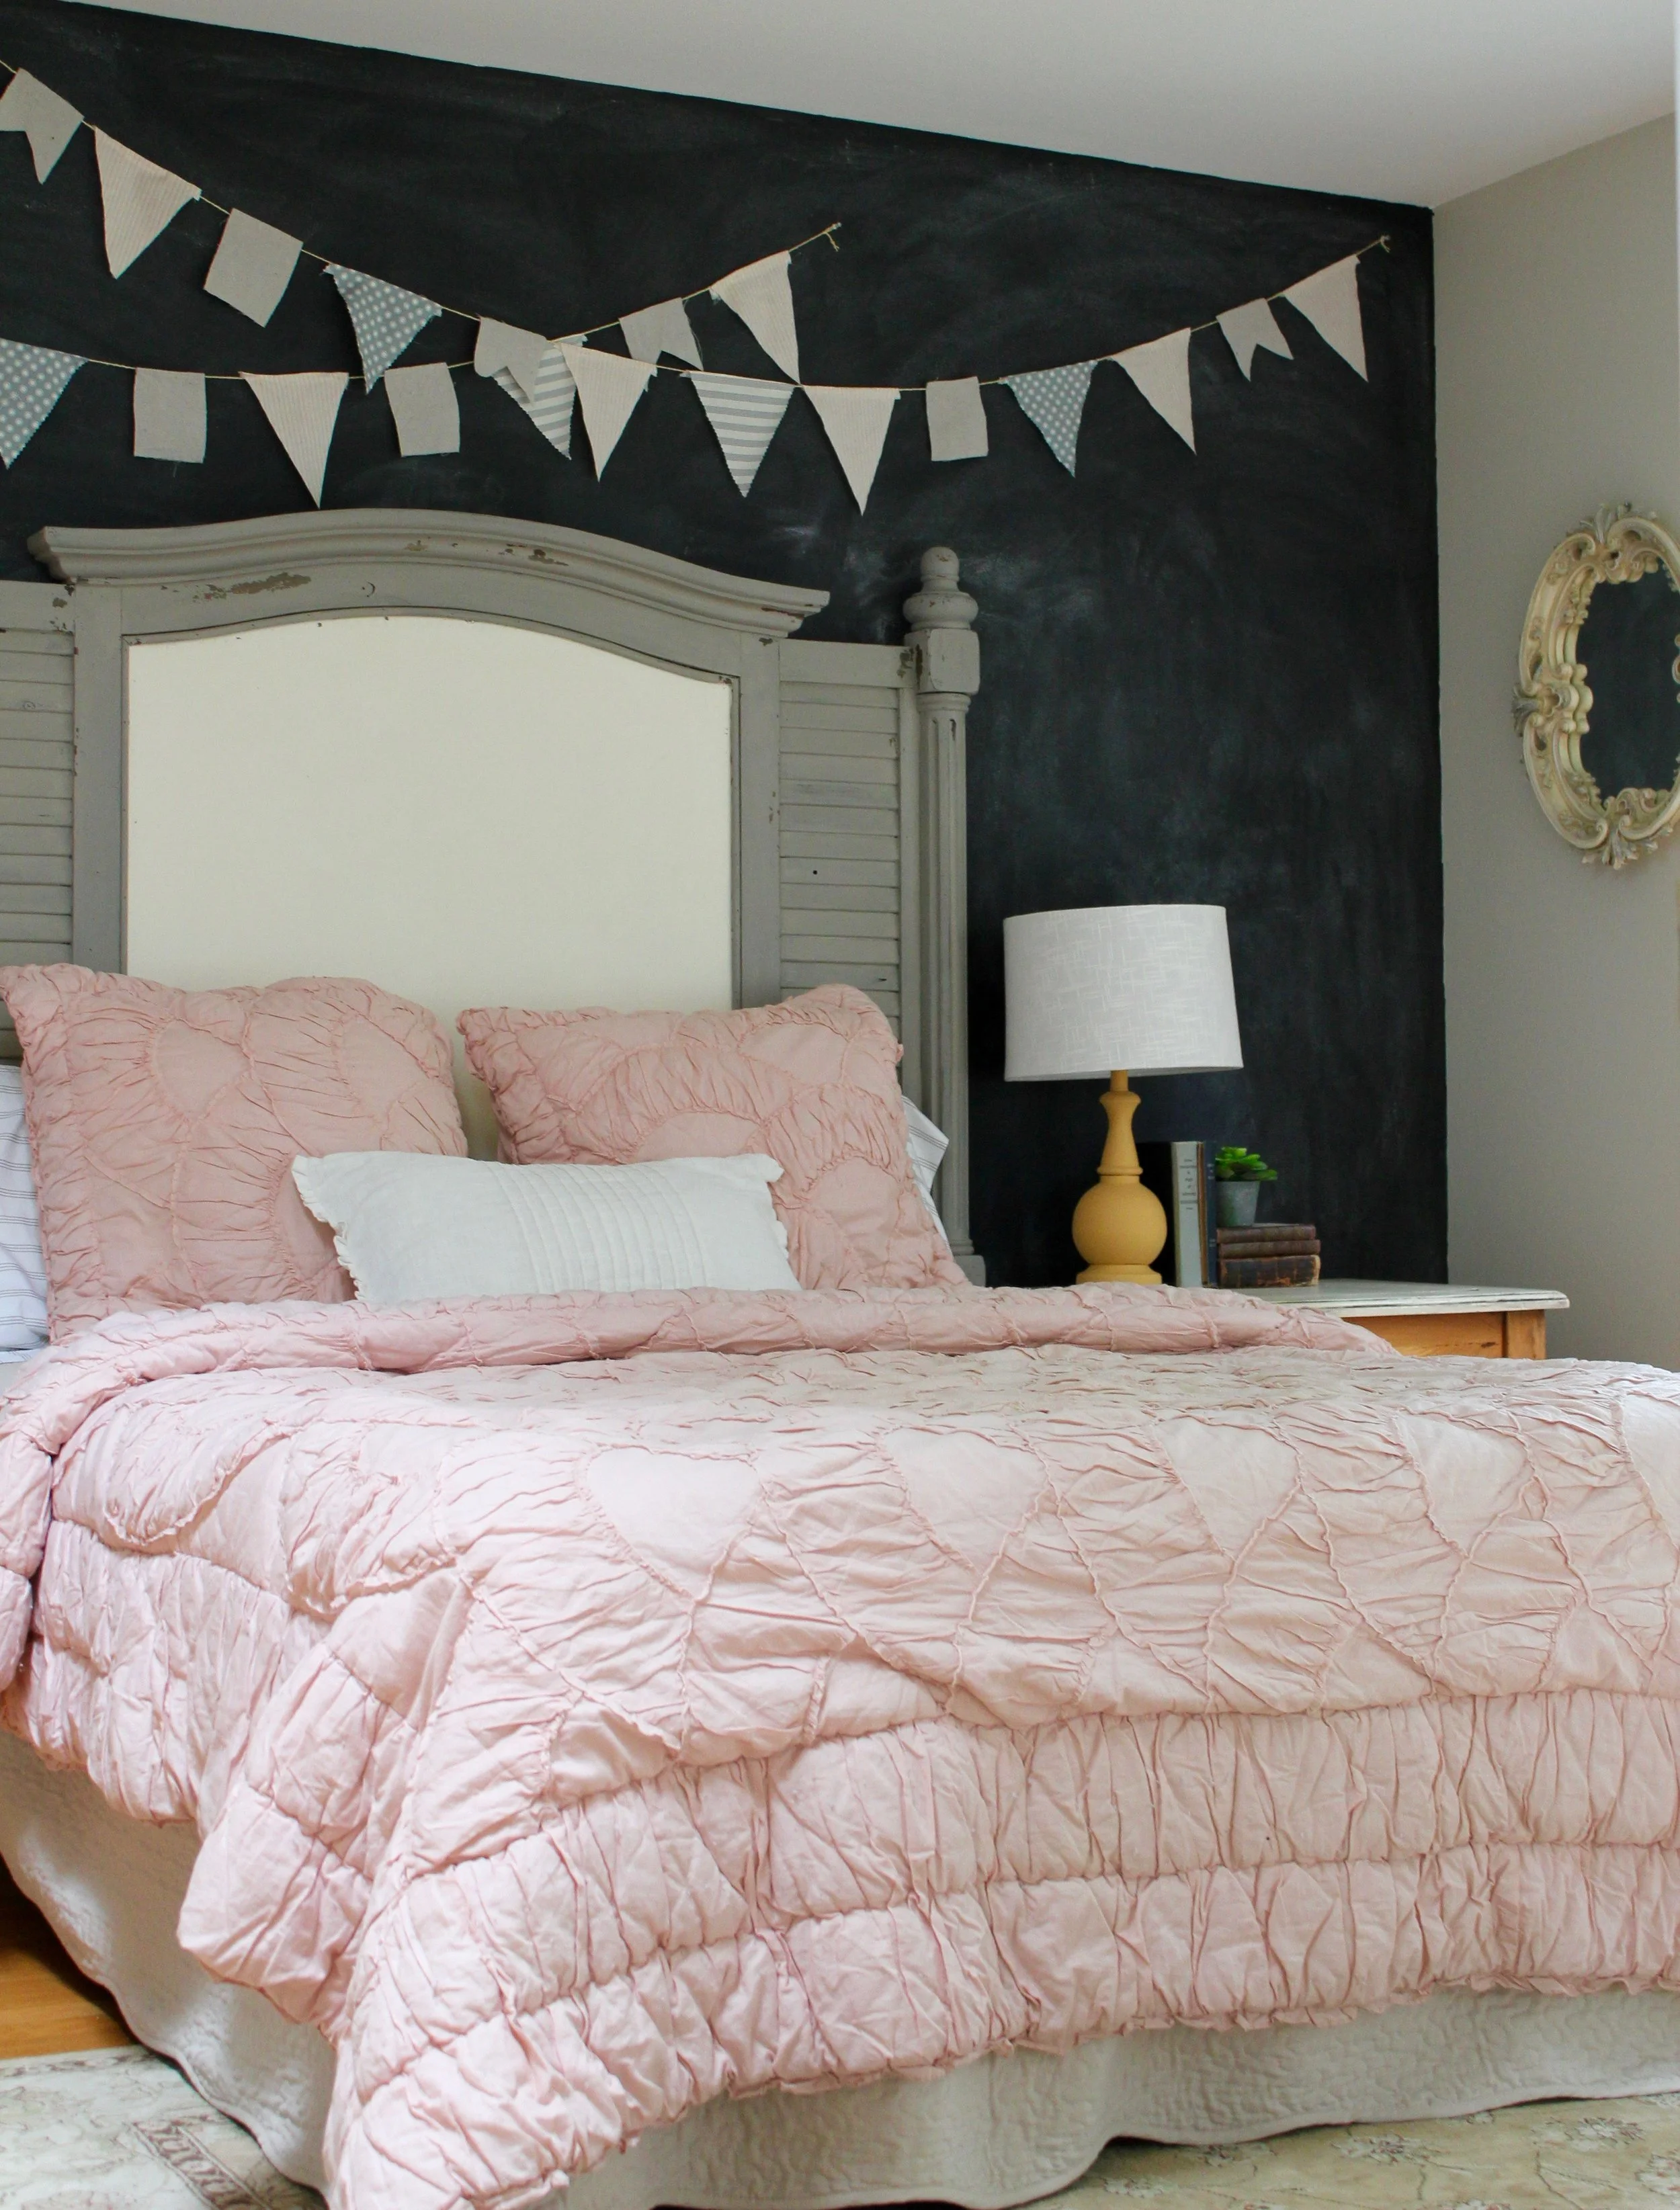
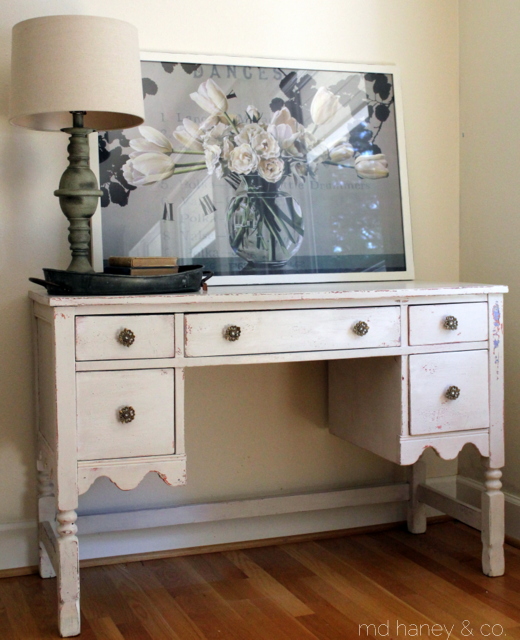
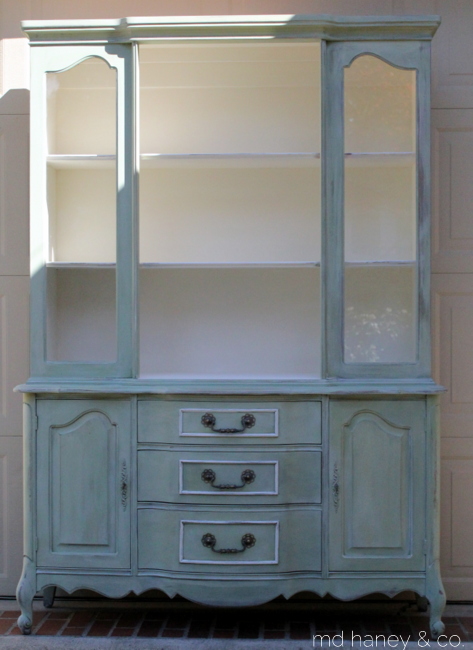
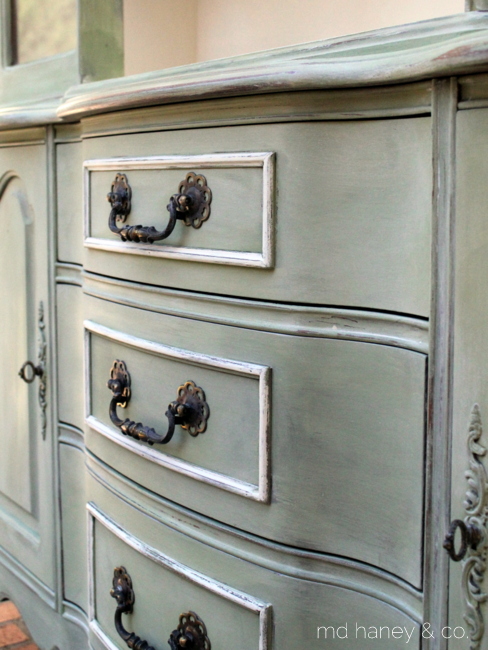
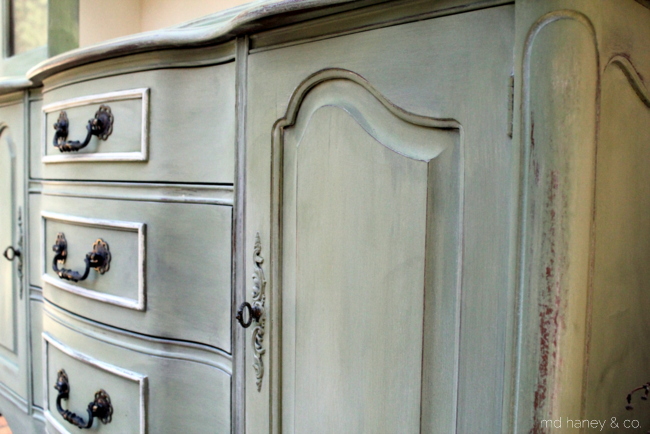
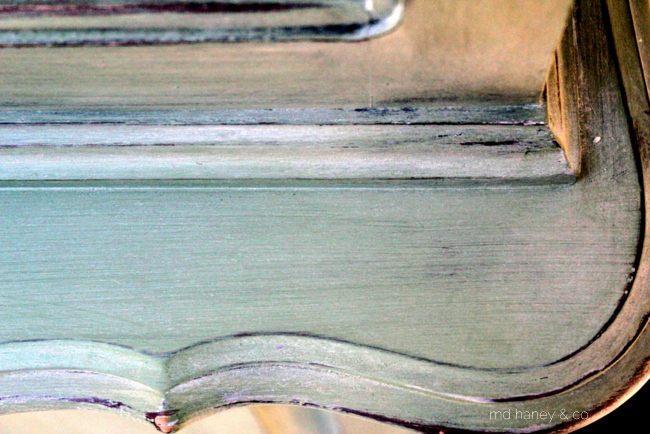
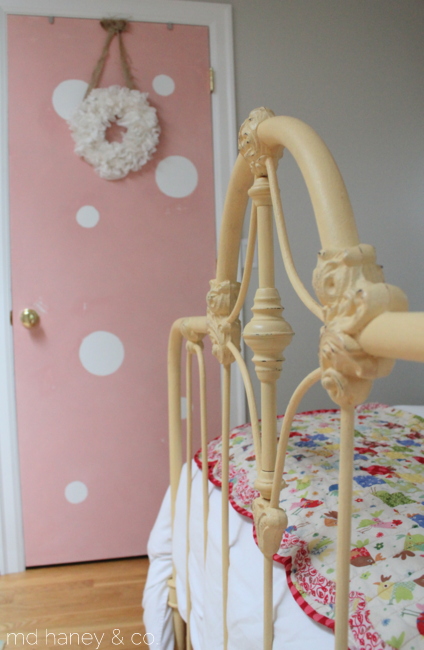
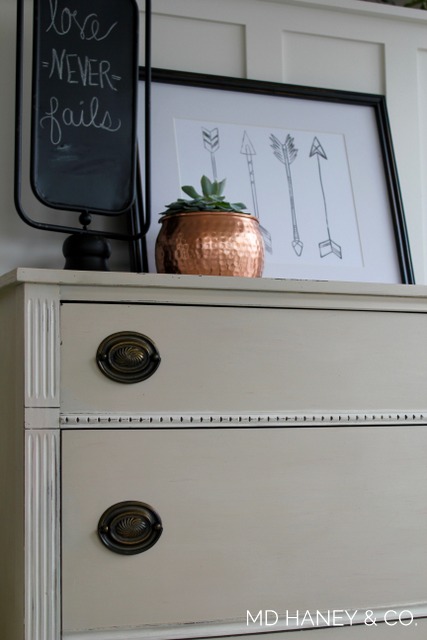
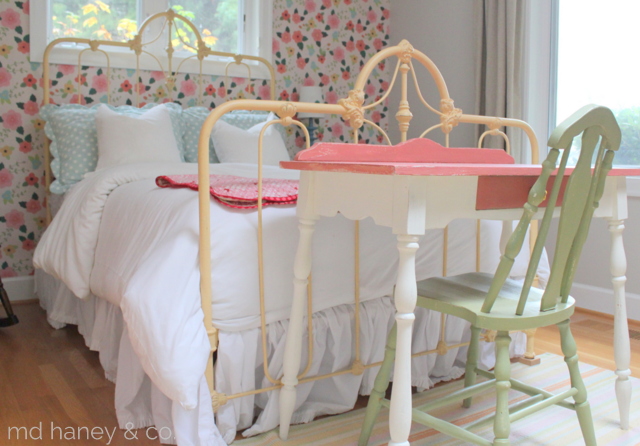
A few months ago I purchased a dresser to paint for the shop, this headboard was part of the package deal.  I just wanted the dresser, so the headboard was basically free ;)  I removed the damaged paneling in the center and painted the piece with Miss Mustard Seed Milk Paint (Bergere and Linen).  I sealed the paint with Miss Mustard Seed Tough Coat.

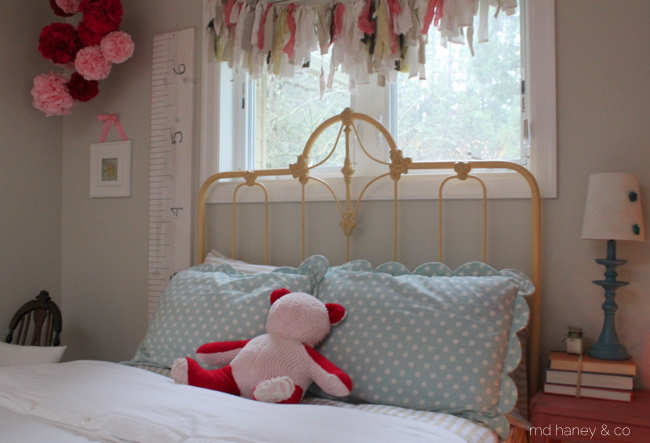
The sweet pink bedding is Pottery Barn kids and I purchased it from a dear friend's garage sale a couple of months ago.  The rest of the bedding was extra from the cottage!  

galley wall
pictures
pictures
up close
gallery wall

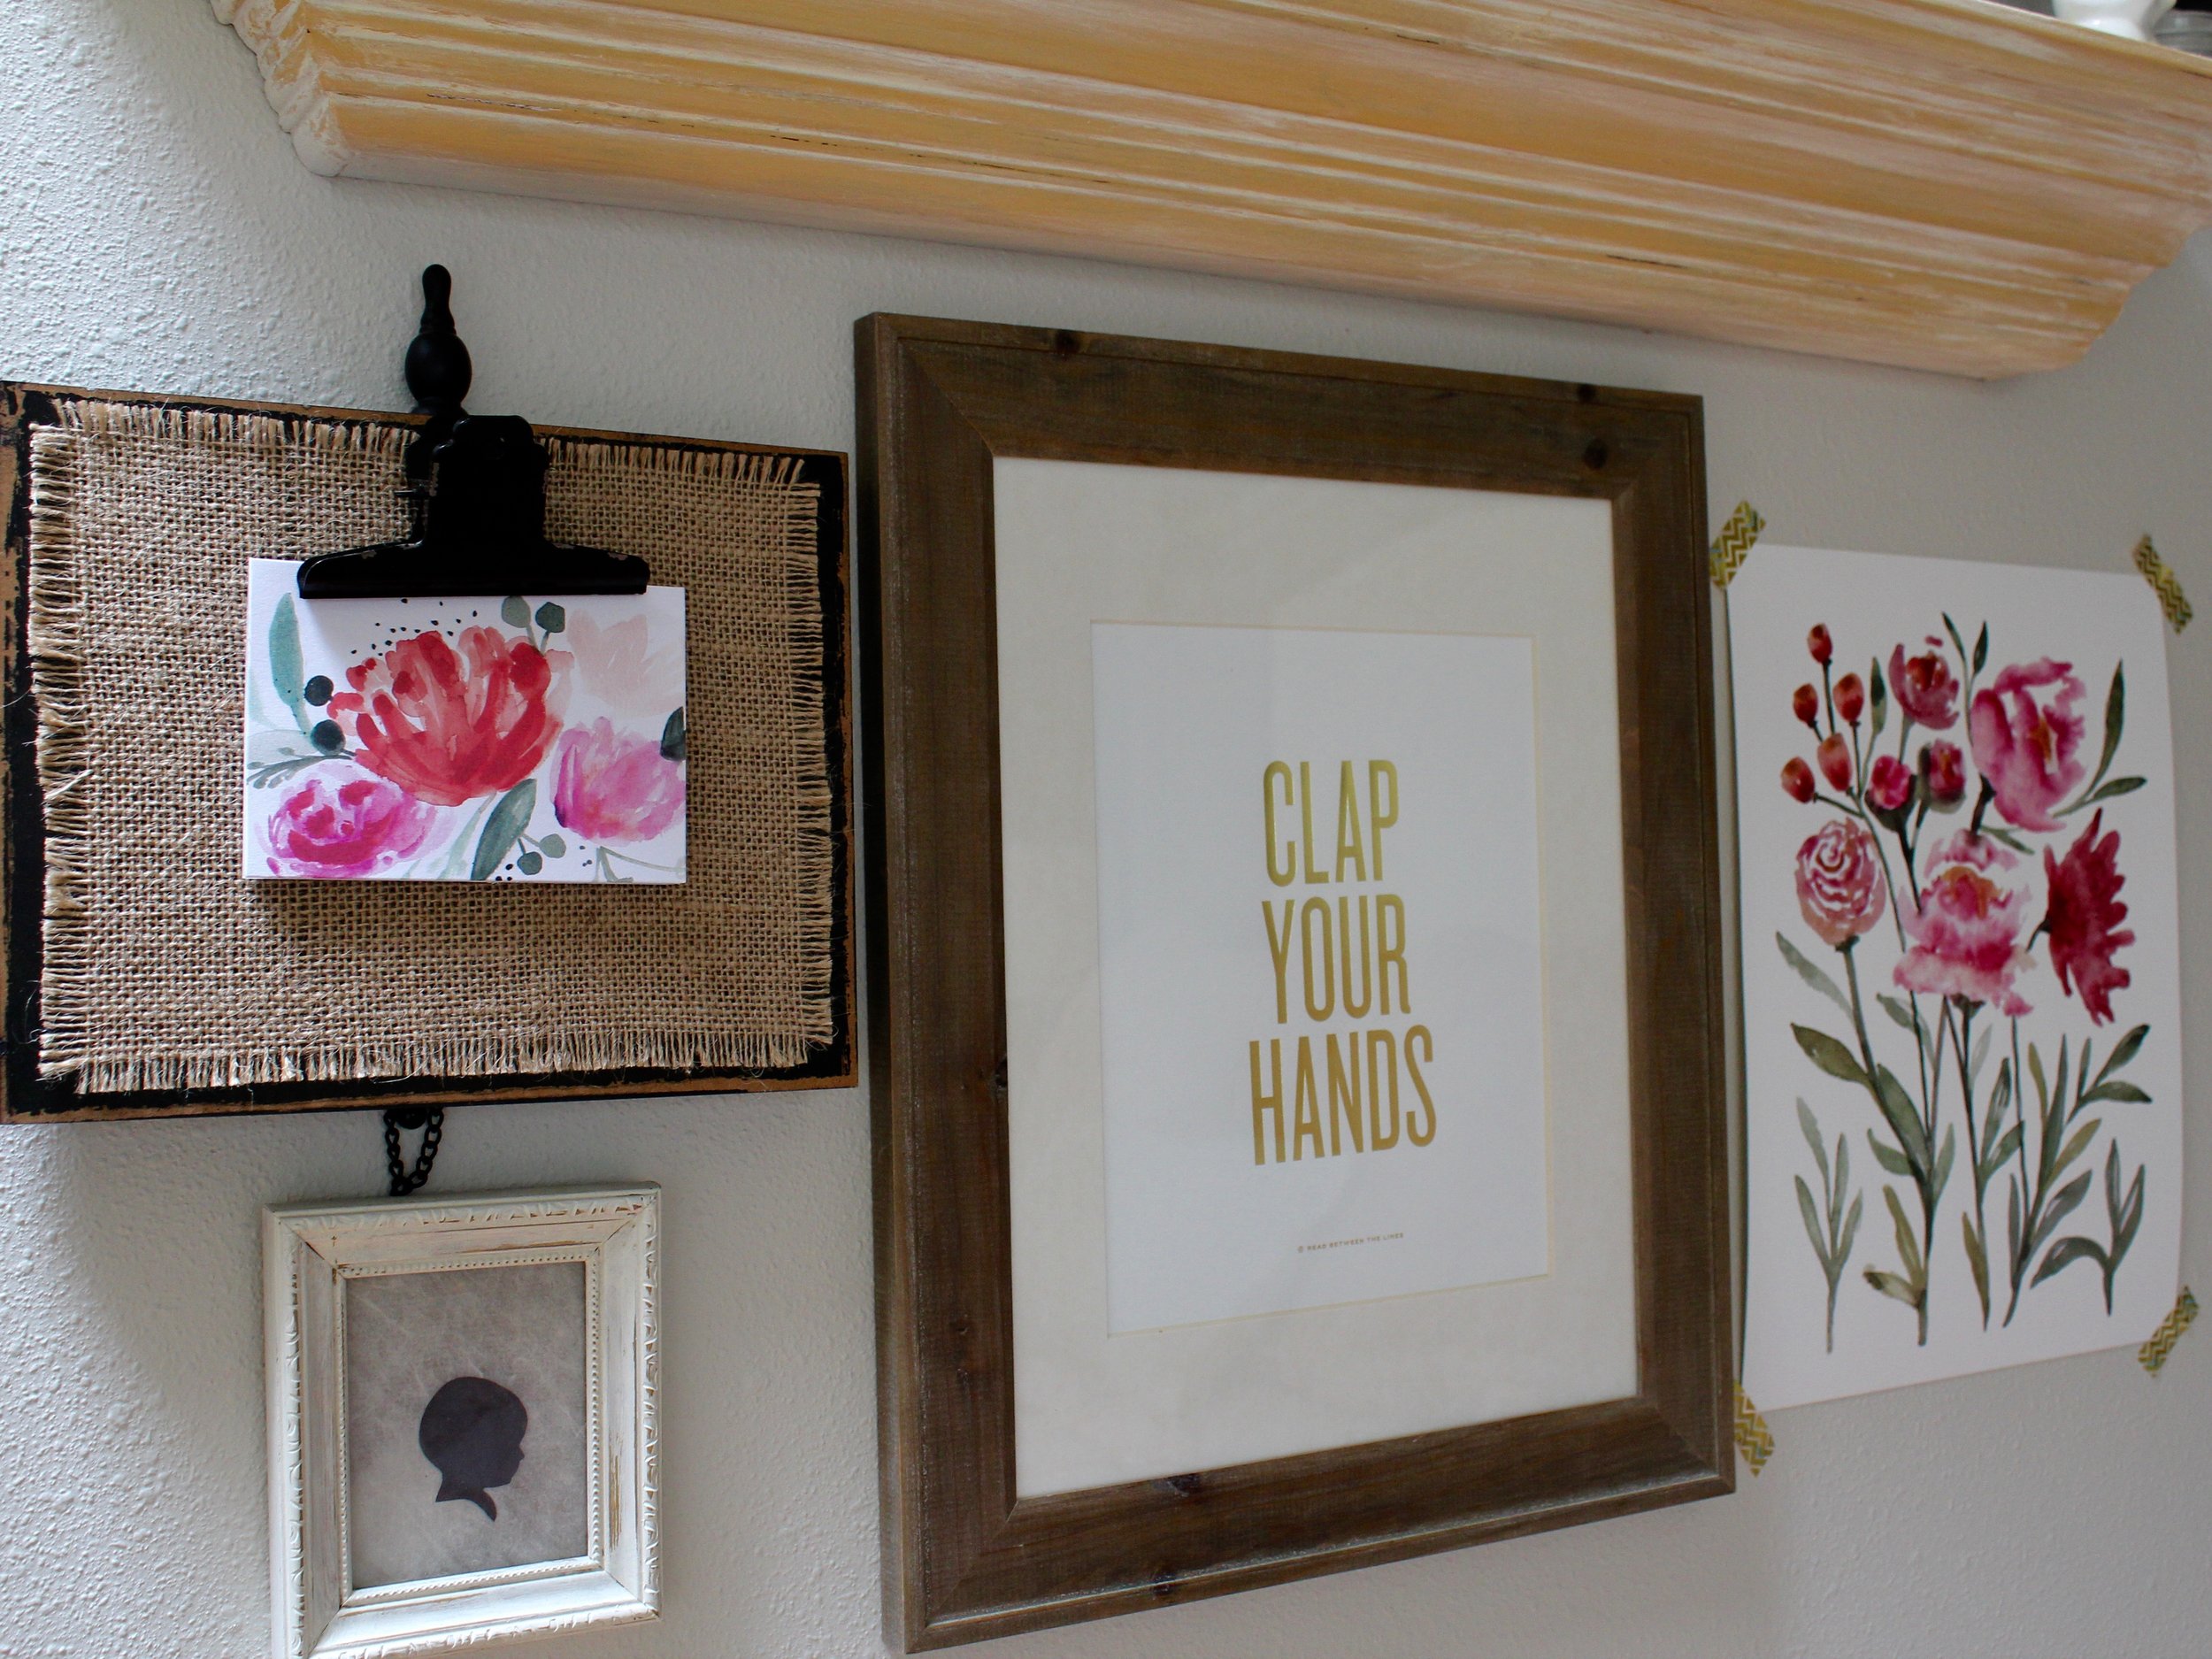
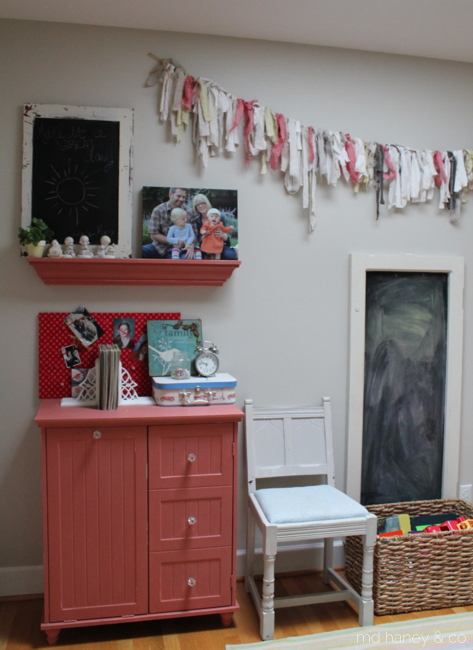
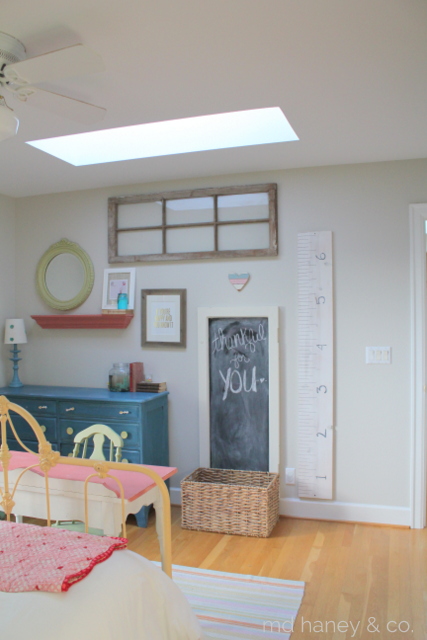
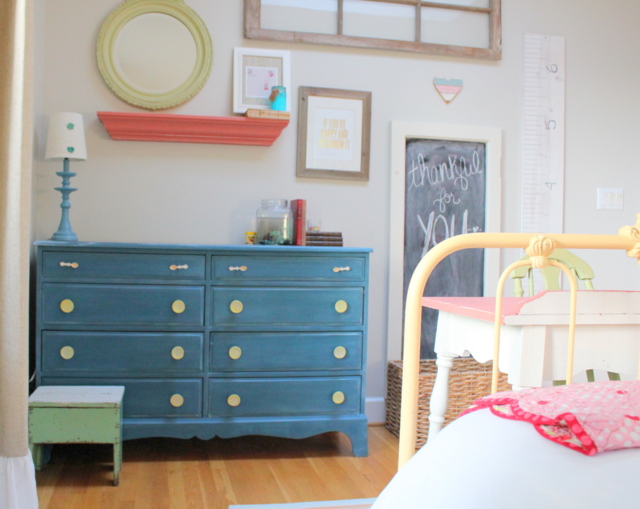
We did a little gallery wall of some new and collected art and trinkets.  I just purchased the water color from a local artist who had a booth at the Farmer's Market, I love that it ties all of the colors together!  Savanna painted the little fox on the shelf and her little silhouette is from 3 years ago!

lamp wall
lamp

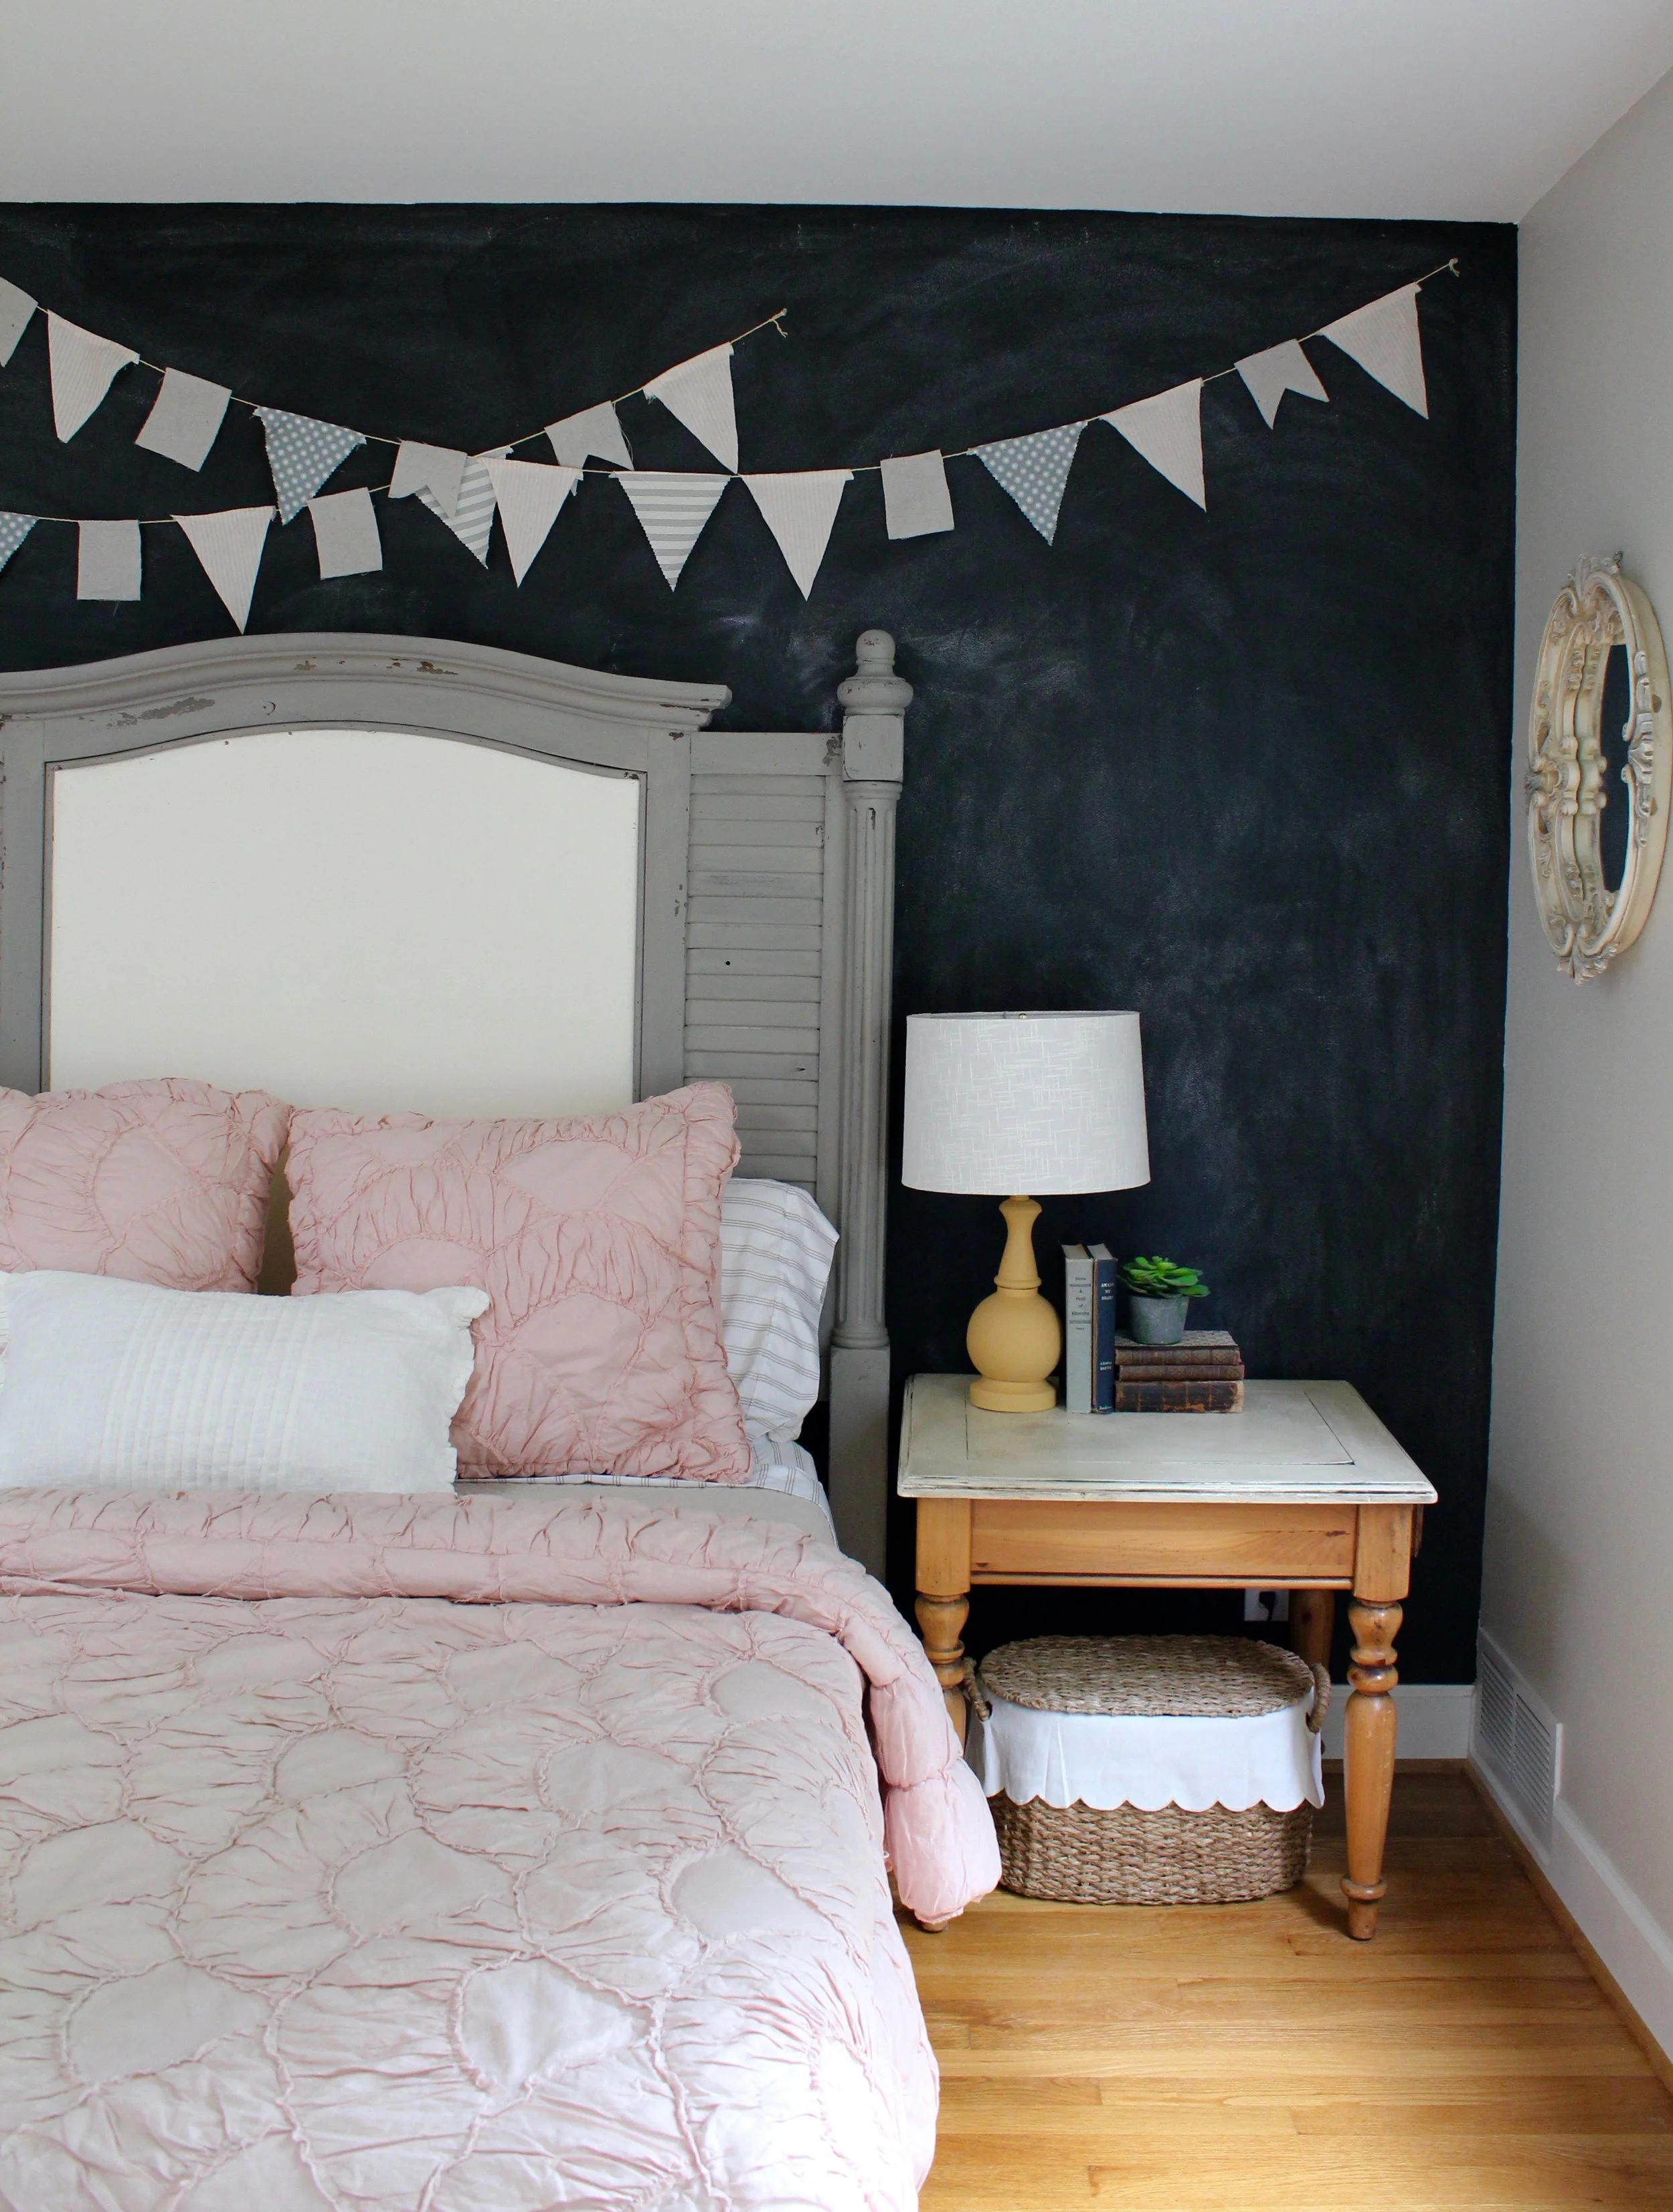
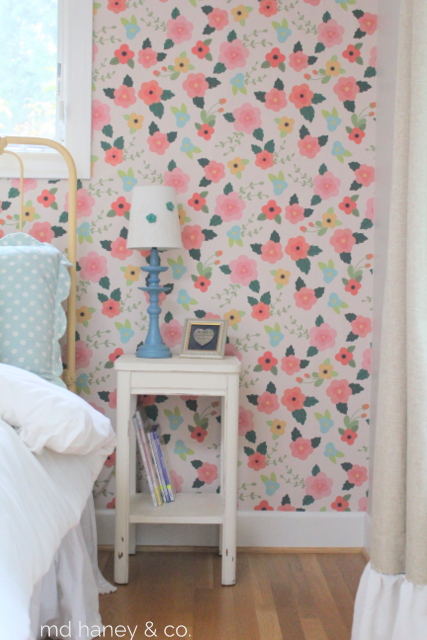
The yellow lamp was actually in my stash of extra lamps. Do you have a stash closet?  I do, one with extra pillows, inserts, lamps and such.  If I keep in contained in a closet I don't feel like such a hoarder!  Anyways,  I painted the base with Chalk Paint (Arles) and sealed it with clear wax.  I am on the hunt for a whimsical lamp shade, but for now the white linen shade will do.  I also found these darling baskets with scalloped linens and lids from Ballard Designs.  I love them!!!  I can find places all over the house for them.....yikes!

painted door

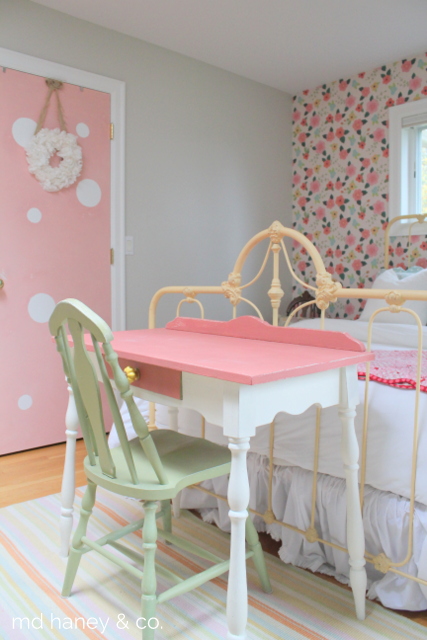
We painted her closet door and added some polka dots....the room was starting to feel a bit too 'grown up'.  She is very much a fun, spunky, full-of-life 4 year old so the polka dots help add a bit or whimsy to her room.  She also got new bamboo shades!  I love the warmth and texture it adds to the room.  Her original blinds were broken and the window is so large, it caused me too much drama every night when I would go to close them!  Eventually I would love to add more bamboo shades, but we have nice white blinds that were here when we bought and I just can't justify replacing them at this point.

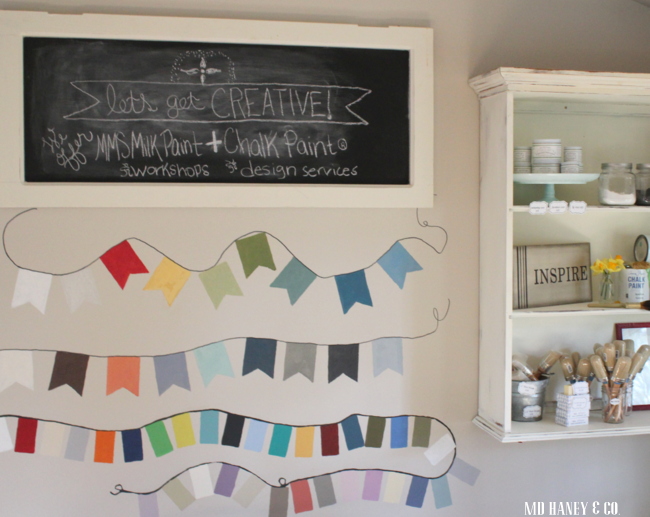
That chalk board wall is a really fun part of her room too!  The girls love to draw pictures and Addilyn will leave little hand written notes for Savanna, it's pretty sweet.  The chalk dust does get a little messing, but nothing a wet rag can't clean up!

If you have any specific questions, please email me or ask in the comments, I am more than happy to answer!

Happy weekend friends!

BUFFET || painted with MMS MILK PAINT

buffet

I found this beautiful, but worn out and damaged, buffet a few weeks ago and I couldn't wait to start painting it!  I like painting pieces at home, instead of at the shop.  At home I can paint in the garage/studio and the girls can play outside.  Much better than dragging them to the shop while I paint for a few hours at a time ;-)

This piece is a newer piece, but it had a lot of damage.  I sanded and used wood filler to fix most of the cosmetic problems.  I decide to paint this piece with Miss Mustard Seed Milk Paint.  I used one of her European colors, 'Schloss'.  It's a beautiful gray/brown and I just love it with the dark top!!

buffet2

The top is a wood veneer but the veneer was so thin, it wouldn't stand up to me sanding out all of the water marks and rings.  I decided to use Milk Paint on the top too, I used 'Curio' to give the look of a heavily stained wood top.  I sealed the entire piece with MMS Tough Coat and then I added two coats of MMS antiquing wax on the top.  

We had the perfect spot for it at the shop!  Dimensions are at the shop so please feel free to call or email if you are interested!  It's a biggie (and a heavy one!) and for sale at the shop for $595.

buffet3

Hope you have a great week!!!!

painted dresser || Chalk Paint® + MMS Milk Paint

About a month ago I picked up this cutie of a dresser at Habitat.  I thought it had darling lines and it was in good shape, it just needed some paint!

I kept the original brass hardware and I painted this dresser with 3 coats of Miss Mustard Seed Milk Paint, MARZIPAN.  I painted the sweet trim pieces with Annie Sloan Chalk Paint®, OLD WHITE.  I lighting sanded, just to distress the edges.  I sealed the entire piece with two light coats of Annie Sloan Clear Wax.

This cutie is for sale at the shop for $285.

removable wallpaper || little girl's bedroom

So, I have wanted to add some wallpaper to Addilyn's room for a while, it's just been low on the priority list.  Well, I finally pulled the trigger and on Sunday afternoon, the girls and I installed the sweetest, removable wallpaper.  Can you believe that?!?  It's removable.  No messing up the walls when you want a change and pretty easy to install!! wallpaper

wallpaper


desk

I have slowly collected and painted things for her room, all things that match her striped Dash + Albert rug.  It's just the sweetest rug with cheerful, fun, girly colors.  I wanted the wallpaper to match what was already going on in her room.....

pillows

deskanddoor

wallpaper

The girls are at such a fun and sweet age.  We sure have fun together!  Even hanging wallpaper....although we had our moments ;-)

teddybear

This is Ted.  Matt gave Addilyn Teddy Bear for her first Christmas.  She sleeps with Ted every night, so sweet.  Ted is quite worn and very well loved, and wears some pretty dresses....

nightstand

gallery

dresserI just love how bright and cheerful her little room is.  In case you are curious....

Dresser: painted with Miss Mustard Seed Milk Paint, FLOW BLUE.  Lightly distressed and sealed with clear wax.

Stool: vintage

Metal Bed: vintage.  Painted with Annie Sloan Chalk Paint, 1 part OLD WHITE and 1 part ARLES.  Sealed with clear wax.

Writing Desk: vintage. Painted with Annie Sloan Chalk Paint, OLD WHITE and SCANDINAVIAN PINK.  Lightly distressed and sealed with clear wax.

Chair: vintage. Painted with Miss Mustard Seed LUCKETTS GREEN.  Lightly distressed and sealed with clear wax.

Night Stand: painted with Annie Sloan Chalk Paint, OLD WHITE, lightly distressed and sealed with clear wax.

Wallpaper: removable wallpaper from WALLS NEED LOVE, LOTUS print.  

PROGRESS || an update on the custom cabinetry job

For those of you that I talk to on a weekly bases, or even "here or there", you know that Matt has been working on a HUGE custom cabinetry job for the past six months.  The clients are the kindest, sweetest people and they have really good taste!  I thought I would post some progress photos of the cabinetry. bittner2

Can you believe the kitchen hood?  Matt came up with the design and I thinks it's amazing!  He had the metal fabricated and he made the corbels from the same reclaimed beam that he used to trim out the bottom of the hood.

bittner

These built-ins are in the dining room.  It's hard to tell from the picture, but the glass is seeded and the wood paneling in the black cabinet is all reclaimed wood.

1934442_929100643853414_6630606144380343841_n

This kitchen is truly stunning!  Matt made the kitchen island in two pieces, it's made out of reclaimed wood {or course ;-} and finished with four coats of sealer.

mantel

Matt made this mantel from a reclaimed beam.  This is in their living room and it will get cabinetry on both sides of the fireplace.

12400457_926537860776359_6252045796921532522_n

This guest bathroom vanity is one of my favorite pieces!  It's so simple and yet so classy!!  It's made out of...you guessed it....reclaimed wood!

12552818_926175304145948_6735735982390669500_n

Here is a shot of one of the kitchen walls.  The view out that kitchen window is amazing!!

I hope to get some photos of the finished space within the next month of so.  Matt still has some hardware and shelves to install, and then he will start work on the custom cabinetry in the office and a custom dining room table.  I promise to post pictures soon.....it's a beauty, that's for sure!!

painting a new door + making it look old

One of the many things I love about our home, is the potential to never run out of projects!  In the next couple of years, we hope to do an extensive kitchen remodel.  Until then, when the 'itch' hits to change something up in the kitchen, I usually resort to paint ;-) We have a fir door in our kitchen, it's in pretty good shape (except for where the dog scratches when he wants to go out to play…..)  When we remodel, I would love to replace the current door with a dutch door, similar to this...

dutchdoor

For now, paint will have to do!

IMG_5702


IMG_5706

IMG_5708-001

(first coat ~ FLOW BLUE)

IMG_5725

IMG_5728

IMG_5734

I used Miss Mustard Seed Milk Paint for this project.  I applied one coat of FLOW BLUE (no bonding agent).  After the first coat of paint dried, I rubbed corners with vaseline.  The vaseline causes the next coat of paint to resist, it makes for great distressing!  I then applied two coats of SHUTTER GREY.  I distressed the door and finished it off with two coats of clear wax.  The picture isn't a very good representation, I feel it looks much better in person!

Just a fun and easy project that I was able to complete in an afternoon!

I hope to have a lot more pictures to post soon!!  Matt and I have both been super busy with work and I often forget to take pictures. ;-)  Plus, I am soaking up every summer minute with my girls, 2 and 4 years old is such a fun (and exhausting) age, I don't want to miss a second of it!!

CHIPPY VANITY || a painted vanity

I have this sweet little vanity that I got about 5 years ago.  I originally painted it for Addilyn's nursery.  I used milk paint (I was super pregnant and wanted something safe to work with) and painted it a sweet shade of light green.  I have always loved this little vanity, and had no intention of selling it!  However, I just don't have a place for it and I need furniture for my little space at La Bella Casa!  So, it got a makeover and will be headed to the shop next week….

IMG_5648  IMG_5654 IMG_5659 IMG_5651

IMG_5650

It was originally painted with a blue paint (probably lead based, the piece is very old).  When I got it, Matt completely sanded it down for me. I layered several milk paint colors and love the chippy, old look.  I sealed it with wax, added some pretty knobs, now she is all set for a new home!

parties for the kiddos || teaching little ones to paint

One of my favorite parts of working with paint, is teaching others how to work with paint. Even better, teaching little girls. They are always so excited, well behaved (the class typically runs just over one hour) and they are just plain cute! IMG_5603


IMG_5604

IMG_5600

IMG_5609

Sometimes Addilyn gets to help….which she loves!

IMG_5612

If you are interested in having a painting party for your kiddos, here is some more information!

kidsclass copy

Happy Painting little ones!!

PAINTING CABINETRY WITH MILK PAINT || Miss Mustard Seed Milk Paint

It's hard to believe, but we have been living in our home for a little over a year now!  Our first 'big' project for the interior of the home has been our basement.  We turned the 'bonus room' area into a play room for the girls.

IMG_4376

BEFORE

IMG_5197

AFTER

And we just finished part of the downstairs living space.  We still have a lot to do, but it's clean and now has furniture!

IMG_4411

BEFORE

IMG_5522

AFTER

When this area is completely finished (we still need to install the fireplace hearth and wire/glass on the cabinet doors) I will post a lot more photos.  However, my sweet hubby has asked that I let him finish the space before posting photos ;-)

One aspect of this little reno, is the entertainment center.  Since my dear husband was not a super talented, MVP, major league baseball player, we didn't have much of a use for a cool trophy case.  Matt modified the existing cabinetry so that it looked more like an entertainment center, we added some new glass doors, open shelves and a space for the ginormous TV.  Once the modifications were finished, I painted it with Milk Paint (TYPEWRITER) and sealed it with Hemp Oil.  I thought I would share a few tips on painting (previously finished) cabinetry with milk paint.

IMG_5518

IMG_5516

IMG_5514

IMG_5512

1.  Sand the cabinetry.  It doesn't need to be stripped, but you will have better results if you sand it with a course grit sand paper.

2.  Clean the cabinetry with TSP, Krud Kutter or a degreaser cleaner.  You can also use denatured alcohol to clean your cabinetry.  Once you have cleaned the cabinetry, wipe it down with a damp cloth, and then finally wipe it down with a dry cloth.

3.  Mix your Milk Paint well.  It's important to mix your milk paint, and continue to mix it as you paint.  (I applied two coats of TYPEWRITER.)

4.  Hemp Oil can be used as a top coat and it's  best on porous surfaces, so it can penetrate the surface instead of just hanging out on top.  Hemp Oil is your top coat, you don't need to apply anything on top of it.

5.  For this size of project, I used a brush to apply the Hemp Oil.  You can use a rag, but I feel the brush is easier.  I used the hemp oil to "wet sand" this cabinet.  To "wet sand", I brushed on the Oil, and sanded the entire piece with fine grit sand paper.  Once you wipe away the excess Oil with a cloth, you have a super smooth finish.  I wanted a slightly distressed look, so I sanded the edges with a bit more pressure.

6.  For an even finish, you will need to apply 2-3 coats.  The key with Hemp Oil,  is to only apply what the surface will absorb.  If you apply too many coats, the Oil will sit on top.

7.  While the oil is dry to the touch, it needs about 30 days to fully cure.  You can use the piece during this period, but it might feel a little oily to the touch while it’s curing.  I would recommend not setting items on the piece while it's curing.

I hope this inspires you to paint something!


PAINTED HUTCH || miss mustard seed milk paint

I finally finished painting a hutch that has been sitting in the garage for a few months.  I bought it to use as a milk paint display for the new shop, then things fell through with our downtown shop location so I just let the hutch sit un-finished.  Well, things are moving forward again with the shop space so it's time to get these pieces painted!

IMG_5493

IMG_5497

IMG_5491

IMG_5495

Since it will be a display for Miss Mustard Seed's Milk Paint line, I figured it should be painted and finished with Miss Mustard Seed products {wink}.  I layered, and dry brushed with IRONSTONE, LINEN, GRAIN SACK AND LUCKETT'S GREEN.  I accented some areas with LINEN, distressed the entire piece and finished with with white wax.  I left the original hardware because I liked the look of the brass.  That may change when it gets into it's new space, but for now it works!

IMG_5500

IMG_5499

IMG_5501

IMG_5502

We are starting to work on some outside projects {of course, before other projects are finished}!  I am starting to plan the garden, the chickens have spent the winter in the garden so I need my sweet husband to build a chicken coop and a new pen.  Of course we want to add some goats to our little family this summer, so they will need a little place to live, and the list goes on and on.  Plenty of fun projects to keep us out of trouble!

IMG_5444

And my little baby is turning two next week!  Time continues to fly and I am always reminded that each day is precious.  No matter how long the to-do list is, I always want to cherish the time spent with family and friends!

CENTERPIECE WORKSHOP + A BIG GIRL BED

So this weekend we hosted a centerpiece workshop.  It was a lot of fun and always a treat to meet new ladies!!  I never remember, or have time, to snap photos of events, but this time I tried to be intentional of snapping a few photos.  {My apologies about the quality of photo, all of the lights were on and I am not a professional:}

IMG_5106

IMG_5109

IMG_5110

IMG_5105

IMG_5111

It was such a fun workshop!  Friday night we had a full house, and Saturday morning had a few less but still full and fun!  Each lady painted their box with Milk Paint and then filled it with fresh greens and embellishments.  It's so fun to see how different each centerpiece turned out.  Everyone walked away with a beautiful centerpiece and a giant smile, so I would say it was a success!

And in 'Haney news'….

we just got a dog.

The sweetest bulldog ever!  He is such a sweet heart and the girls love him! tank

The roof is going on the barn.  We were going to install a metal roof and then last minute we switched to a comp roof.  Lots of reasoning behind the switch but I will spare you the details!

barn1

And with Savanna getting Addilyn's big girl bed, Addilyn got a 'new' big girl bed.

IMG_5128

IMG_5124

IMG_5120

IMG_5126

IMG_5115

I purchased this bed years ago at a barn sale.  It was rusted and chippy and I didn't have a space for it but I just loved it!  It sat in the garage for years and then last year, my sweet husband scraped all of the loose paint off and we painted it with Chalk Paint®, {1 part old white and 1 part arles.}  We decorated Addilyn's room for Christmas, and both of the girls love snuggling and reading on her new bed.  This is such a fun {and very exhausting} age.  It melts my heart to see the girls playing together!  I try to remind myself that this stage will pass so soon and I want to be present and cherish our times together.

Well, I need to get back to painting the basement entertainment center before the girls wake up!  Hopefully I will be able to post 'finished' photos soon!!

xoxo

VINTAGE VANITY || painted with milk paint

Customers all always asking me which I prefer….Milk Paint of Chalk Paint®?  My answer is usually the same; it totally depends on the piece of furniture and the scope of the project!

IMG_4808

IMG_4791

IMG_4802

This vintage vanity is feminine and very detailed.  Not to mention old with really darling curves an.

Four years ago {when I was very pregnant with my first} I stripped and sanded {well, my not-pregnant-sister sanded for me} this vanity down.  This was before Chalk Paint® or Milk Paint had become popular, before Pinterest, before I could google 'low odor' or 'natural furniture paint".   Anyways, I researched about Milk paint and I was able to locate a brand of Milk Paint that was carried in Portland.  I painted the vanity and a dresser a light green…I was hooked!  Milk Paint gives a very authentic finish, it adds to the character of an old piece.

Last month I participated in Carlton Crush-a local street fair/carnival event.  My theme was white pumpkins with pops of muted orange and pink.  I painted the vanity with a new color of Milk Paint {MMSMP apron strings} and used it as a display piece.  Last month I had no intention of selling it!  Now I need room in the studio for more furniture pieces I have picked up, so I am going to sell this darling vanity.  It would be perfect in a girls' bedroom, bathroom, home office or even in a living or dining room!

IMG_4809

46" Long x 30" Tall x 19" Deep

White Milk Glass Knobs

$195 ~ free local delivery available


MILK PAINT || my favorite colors {at least for this week}

I promise to start posting some 'after' pictures!  We have been busy with projects {both Matt and myself} but I am so bad about documenting the finished project with pictures!!  Maybe next week?!?

On another note, I have slowly been getting the studio organized and it feels so good!  A few months ago I started carrying the line 'Miss Mustard Seed Milk Paint'.  Next month I head to California for a two day training so I figure I better start working on color samples!  Here are my favorite Milk Paint colors….and when you see them in my living room you will see why they are my favorite {for right now anyways ;-}

IMG_4746

IMG_4747

IMG_4762

IMG_4768

IMG_4746

MMSMP colors from top to bottom~

LUCKETT'S GREEN

BOXWOOD

KITCHEN SCALE

FRENCH ENAMEL

FLOW BLUE

EULALIE'S SKY

ARTISSIMO

FALL CLASS SCHEDULE

IMG_4608

Just a quick note to let you know that the Fall Class Schedule has been updated on the 'paint + classes' page of the website and I will post it here as well.

I am getting ready for a booth at this weekend's Carlton Crush Festival, as well as tending to my sick baby girl and recovering from a yucky flu bug…so I probably won't  do a fun blog  post this week.  But next week I will be back 'on my A game'!

Have a great week!!

fall class schedule copy

BEFORE & AFTER || a sewing table

A few weeks ago I picked up this darling little sewing table at Goodwill.  It was only $8 and I was looking for a little table for our master bedroom.

Now I forgot to take a 'BEFORE' picture, but I took one shortly after I started.  I think it's even better than a true 'BEFORE' because it shows how the first coat of white paint looks.  It looks bad and if you haven't painted with Chalk Paint® or Milk Paint, you may get nervous or discouraged after the first coat.  Fear not, the second coat always looks great!

IMG_4552

IMG_4553

A majority of the table is painted with PURE WHITE Chalk Paint®.  It took two coats, and then I distressed the edges.  This is an old piece and I want it to look old and full of character.

I then painted the doors and the fluted detail on the legs with TROPHY MMS Milk Paint.  After one coat of the Milk Paint, I sanded the doors, I still wanted to see the beautiful (but damaged) wood underneath.  The entire piece received one coat of clear wax and it was tucked into the little corner in my bedroom that afternoon!

IMG_4591

IMG_4594

IMG_4596

One of the many things I love about both of these paints is the fast drying time.  I can finish a piece in one day and have it decorated or functioning that evening!!  I am an instant gratification kind of girl and this paint works perfectly for refinishing a piece quickly!  Love it!

VANITY AND CHAIR || before + after

You know how there are certain things you think will just never happen to you?  For no reason, other than you just don't think they will happen.  Well, my computer crashed last week and of course the only thing I ever backed up was Quickbooks (which is good since I would be in a deep state of depression if I had to muddle my way through re-entering accounting for our personal and two business accounts....ugg.) Anyways, I am slowly getting applications re-installed on my computer and now have a fancy-smacny external hard drive attached at all times.  Lesson learned!

I had some great before + after photos of this darling vanity and chair.  Of course I lost all of those photos and haven't yet re-installed my photo editing program.  But, I still thought I would show a few 'after photos'!

IMG_4405

I picked up this darling vanity and chair at a garage sale a few weeks ago.  It was orange and had IMG_4405

I picked this darling duo at a garage sale a few weeks ago.  It was orange, brown and white.

IMG_4408

I used OLD WHITE {Chalk Paint®} for the vanity with one coat of CLEAR WAX. I sanded the edges lightly because this piece had A LOT of paint layers.  I wanted to add to the history of the piece, not make is look like it was brand new.

IMG_4406

I used LUCKETT'S GREEN {MMS MILK PAINT} without the bonding agent.  I sanded the edges and applied a CLEAR WAX.

IMG_4410

I sell fun knobs at the studio.  I snagged this darling white flower knob for a bit of a feminine touch.  Right now this cutie sits in my bedroom.  I am not sure if it will stay there, but it's the perfect spot to keep my planner and journal.

In other news, I thought I would show a few photos of the basement progress.....

IMG_4411

Matt is busy modifying the cabinet so it can house the TV.  He moved windows and doors so we are changing the layout a bit.  He is going to re-purpose the mantel {taken from a job years ago} and then paint all of the cabinet and woodwork white....

IMG_4412

It's a bit of a mess, to say the least, but we are almost ready to start cleaning up and prepping for paint {walls,ceiling and cabinetry}.  Yahoo!

IMG_4413

The play room is right off of the great room.  I am getting ready to paint the walls and then remove the flooring.  Addilyn already loves cozy-ing up in their soon to be book nook.  Love that girl!  And so fun to create a room just for the girls!  I can't wait to start getting some work done in there!

OK, I am off to work on my computer a bit more, super fun.

xoxo~Darci

REFRESHING A VINTAGE OAK CABINET || an afternoon project

Whenever I have a few minutes of free time {girls are playing together and keeping each other happy, so not truly free time ;-} I sneak away to work in Matt's office.

A few days ago, I purchased this great old oak cabinet from a friend.

IMG_4105

She had texted me a photo of it.  I knew it would be perfect for Matt's office!  I wanted something that didn't necessarily need to function, was darker and masculine, and was at a decent price point, this fit the bill!

Hemp-Oil-534x800-534x800

I wiped the entire thing {inside and out} down with a vinegar + water solution.  There were spider webs, a little mold, the usual things you find in  "old, funky furniture".  Once it was clean, I wiped it down with MMS Hemp Oil.

Hemp Oil is so simple to use.  Just pour some onto a clean cotton cloth and rub it onto the piece.   Just wipe it on and, since it’s all natural, it doesn’t have a strong smell.

Hemp Oil takes about 30 days to fully cure.  You can still use the piece during that time, but it might feel a little oily to the touch.

IMG_4102

The top of the piece was in bad shape.  I painted it with Chalk Paint® {GRAPHITE}.  Once the paint was dry, I added a coat of clear wax and buffed it out.  I wanted the top to look a bit more aged, so I added a coat of dark wax.

IMG_4107

The top would look best if it was still the original wood.  But, it's not and I feel this in the next best thing.

IMG_4105

I have to replace a couple of the metal tabs, but other than that, it's good-to-go!

IMG_4104

Isn't it a fun piece?

IMG_4106

And the best part, it took less than 1 hour {total} and cost less than $100!

Have a great weekend!!

THE STUIO || + a little giveaway

Have I mentioned how much I love having the design studio so close to home?  In Carlton, we lived about 3 blocks from my studio.  Not bad.  But here, it's a 10 second walk.  Awesome.

IMG_4050

We do a lot of bike riding on Fridays.  It's fun for the little miss, and we can easily greet customers when they drive up!

I thought I would show you a few photos of the updated studio space.  I still have lots of projects, but at least the space is 'presentable'!

IMG_3827

Remember the 'BEFORE'?

IMG_4057

We started with new paint on the walls and ceilings and a new {laminate} floor.

IMG_4054

The floors have a lot of variation in color which hides dust and dirt well.  And in a working studio, that is a big bonus!

IMG_4052

We switched out a few of the lights.  Matt still has to hang a little chandelier in the entry…..always projects ;-)

IMG_4024

We have a handful of cabinet doors painted in various Chalk Paint® colors.  I still need to paint 15 more doors!

IMG_4025

Not to mention I need to paint another 18 to show all of the MILK PAINT colors!

IMG_4021

I painted a few banners on the wall showing the different Chalk Paint® and MILK PAINT colors.

IMG_4026

I also have trim pieces painted with each color.  It really helps to see the paint applied in different ways.

IMG_4071

Matt was going to build shelves for the wall.  He mentioned using this old hutch top for a shelf instead!  Perfect!  I din't have a use for it, so, I painted/waxed/distressed and it saved him the time of having to build shelves.

IMG_4029

Lots of Spring colors!

IMG_4028

Do you see how dirty those daffodils are?  Do you know how to get the mud off of the petals??  Every time I try I rip the petals!

IMG_4068

And just for fun I thought I would do a little Miss Mustard Seed Milk Paint giveaway.  Trying saying that 10 times!!

IMG_4066

A bar of spearmint and green tea soap to clean your hands and brush when you are done painting.

A sample size of MUSTARD SEED and KITCHEN SCALE Milk Paint.

Fun, right?  I am limiting this giveaway to local gals.  I want to be able to drop it off and give you tips on how to use Milk Paint {if you have never used it}.  Just leave a comment on the blog telling me what you think you will paint with Milk Paint!  I will draw a winner Sunday and deliver next week.

Have a wonderful weekend!!

SIDE TABLES || before + after

So, you may find this surprising.   I have a million little different projects going at once.  Surprising, right??  Before having little people in my home, I could finish projects in no time.  Now, I am accustomed to a little project stretching out for days.  I love this season of life, so I don't mind.  It's teaching me patience and flexibility!

IMG_3979

Since we sold most of our furniture to our home buyers, I am on the look out for little tables.  I picked up these two cuties and thought they could make great night stands.

IMG_3996

For the pine piece, I lighting sanded the bottom, cleaned it really well with vinegar + water, and then applied a coat of hemp oil.

IMG_3997

For the top, I applied 2 coats of MMS Milk Paint {color::  TROPHY}.  I lightly sanded the edges, applied clear wax, then a coat of dark wax.

IMG_3990

I am almost positive I will change it {probably sooner than later}, but for now it fits in our master bedroom perfectly.

IMG_3983

The other little table got 2 coats of Milk Paint {TROPHY} as well.

IMG_3989

I distressed it then added one coat of hemp oil.

These cute little guys work for now and things off of the ground!

Next week, I should have BEFORE + AFTER pictures of my new design studio!  Until then, have a great day and go paint!!